How to make a toy out of thread and glue. How to make a Christmas tree ball from threads - a master class
There are plenty of Christmas toys in every house, but if we have children, we still make New Year's toys with our own hands every year. The master class that we offer today will allow you to make a lot of Christmas decorations at once with almost no cost. These paper and thread toys can be hung on the Christmas tree, tied into a garland for home decoration, or taken to kindergarten as crafts to the New Year.
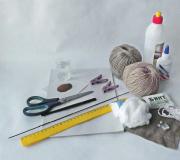
We will need:
- jute threads
- A4 paper (newsprint, writing, office)
- needle 1.5–2 mm
- glue (silicate and PVA)
- tassel
- 1 tsp instant coffee
- 100 ml water
- Knitting
- scissors
- ruler
- clothespins
- jewelry (rhinestones, beads, lace)

- In order to make stars, you need to twist the tubes out of paper. Cut an A4 sheet in half lengthwise. And we wind the paper on the knitting needle at an angle of 45 degrees.

- Press the paper firmly against the needle. We drip a little PVA glue on the corner of the sheet, press it. The first "tube" is ready. You need two tubes for each star.

- Color the tubes brown. This can be done in different ways. I offer you the easiest and most affordable. We take 100 ml of warm water and dissolve 1 teaspoon of coffee in it. Using a brush, evenly soak the tubes with coffee solution and put to dry. The remaining solution is not poured out, it will still be useful to us.

- When the tubes are completely dry, you can get to work. We measure three equal segments on the tube. In our case - 9 cm. We make triangles from the tubes. Glue the remaining tip with silicate glue. For a few seconds, fix with a clothespin.

- We glue two triangles together - so that we get a six-pointed star.

- We apply a little silicate glue to the tips of each asterisk. We take jute threads and wind them around a paper star. We move counterclockwise, and wrap the tips of the stars clockwise.

- We wind until we get a star. We finish winding the threads where we started. We cut the thread and glue its tip with silicate glue on the reverse side.

- We thread the thread into any eye of the asterisk with a loop, tighten and tie the ends. Here are the stars we got.

- You can use colored threads for knitting instead of jute threads. In this case, paper tubes do not need to be painted.

Comment on the article "How to make Christmas decorations from paper and thread: a master class"
How to make Christmas decorations from paper and thread: a master class. DIY Christmas toys: stars on the Christmas tree. Squirrel with acorns: New Year's toy and experience in physics. New Year's crafts on the principle of a balancer.
Ceiling, rope .. Christmas tree. Interestingly, how do you technically imagine how to attach a Christmas tree to the ceiling? so the point is precisely New Year's crafts with your own hands: ideas on how to independently crochet openwork Christmas toys - balls and hearts.
Craft according to technology class 2 "basket of flowers": they gave out 2 sheets, the child only understood that it should be glued onto cardboard. From the received, assemble the panel "basket of flowers" Strelka - you need to wind threads on it, so that it is more convenient to wrap it. Master - class: paper flower.
New Year's hand-made articles. New Year's toys and decorations for the house. Volumetric New Year's crafts "Christmas tree ball". Many of you spend creative minutes or even hours with your children.
Christmas tree toy - soccer ball. ... I find it difficult to choose a section. Foreign online shopping. Buying goods in foreign online stores: selection, payment, delivery, promotions and special offers.
The promised tree for New Year's I'm ready. I'm showing off! :O). Mary the artisan: embroidery and needlework. Cross-stitch, needlework, patterns for embroidery, knitting, sewing. The promised tree for New Year's I'm ready. Well, here she is. And I don’t even know, it seems like I need to stuff more so that the corners don’t sag. And with ...
DIY Christmas decorations: a snowman, Christmas balls and stars. How to make a toy for the New Year tree with your own hands. The New Year is approaching, it's time to prepare gifts and buy Christmas tree decorations. Send photos of your baby's New Year's creations...
DIY toys: tights dachshund and pom-pom caterpillar. Especially for frosty days, we have in store two very cozy ones - a caterpillar made of woolen threads and a dachshund. A master class from needlewoman Irina Shilova will show how to make an angel on a Christmas tree with your own hands.
DIY Christmas decorations: templates and stencils. Partridge - paper craft for the Christmas tree New Year's stencils - for Christmas tree toys and wrapping paper.
Master class with photo. green and white organza. barbecue sticks. threads Paper crafts with your own hands: a paddle turntable. How to make a do-it-yourself spinner We can take ready-made green colored paper and stick it on cardboard, or we can do it ourselves ...
Girls, tell me how you can make a beacon for scissors? I've seen a lot of people, it's very beautiful, but I can't understand the execution technique. Or if it is possible, at least roughly explain the principle of how to do it. I really want the same beauty for myself, please share!
New Year's toys with your own hands: skates from paper clips. Christmas cookies with colorful ice cubes. Decorate the Christmas Tree with Beautiful Stained Shortbread and Sugar Cookies for decoration 2 (16 oz) jars of white frosting Candy for decoration (we...
Christmas trees with their own hands. Do you make crafts for the New Year with your children? New Year's needlework: we sew toys and decorations. Such a little thing can be handed over personally, or you can hang it on a Christmas tree, providing a card with the addressee's name.
But I finished the second toy just yesterday. This is a mouse that I embroidered and sewed according to my own pattern. And HERE I posted step-by-step photos with explanations of how I sewed the toy. The snowman also sewed, so it will do as an instruction for stitching any ...
Toys and games. Child from 3 to 7. Education, nutrition, daily routine, attending a kindergarten and relationships with caregivers, illnesses and physical development of a child from 3 to 7 years. Section: Toys & Games (Does anyone have a good link to Christmas tree crafts?)
Some of the toys are loved, can be used as game pieces, etc. But here are the ones that don’t make any sense. We have a compartment in the IKEA hanging rack specifically for toys from kinders. Easter eggs for the holiday table and as a gift. Master class with photo.
Master class: Christmas tree in English (in English) MK: we braid a Christmas ball with beads MK: weave a snowflake from beads [link-1]. I want to try to make Christmas decorations from beads, based on ordinary Christmas balls, but not Here there are such stylish balls...
Such toys knit! You can be awesome. Then they sell it in passing trains, and secondhand dealers also deliver washcloths all over Russia and sell them for good money. DIY educational toys. Toys from socks, paper, salt dough How to make an amigurumi doll?
The first-grader son was asked to make a model of the sun. it’s clear what I have to do, but I don’t even know which side to approach? what to do? what should this building look like? maybe someone did? I beg you, advise something please.
And we also made from threads. They inflated a balloon to the desired size, took glue in a jar (there are such jars, they are plastic), a skein of simple threads No. 40 will be fine, insert the tip of the thread into a needle, pierce a jar with We made from paper and plasticine\u003e.
You can easily make original stylish Christmas balls with your own hands. A New Year's ball made of threads looks very attractive, it does not require special skills and money, the use of these balls-cobwebs is unlimited, wherever there is enough imagination.
You can decorate a Christmas tree with balls of thread, create a festive interior decor. And they can also be an original gift for the holiday.
You will need:
- inflatable ball
- Petrolatum
- Colored threads, the thicker the better
- PVA glue
- Scissors
Inflate a balloon of the desired size. Lubricate the ball with Vaseline, so that later it would be easier to detach it from the glued threads.
Mix PVA glue with water. Dip the threads into this mixture.
We wrap the ball with thread. Or we pierce a jar of glue with a thick needle on both sides. We thread the thread into the holes directly from the skein, without cutting it. Slowly pulling the thread through the jar, wind it around the ball. She soaks herself in glue.
The more layers of thread, the stronger the ball will be, but if you wind too much, it loses its airiness and transparency.
Let dry for 1 day.
Once the balloons are dry, carefully deflate the balloons. If done carefully, they can be used several times.
You can decorate the resulting gossamer balls with beads, beads, feathers, ribbons. You can make the effect of snow: we moisten the ball with glue and dip it in semolina or powdered sugar. You can use threads of different colors, then you get a very beautiful weave.
If you are unable to wind the glue-soaked thread around the ball, you can wind the dry thread, and then carefully soak it with glue with a brush or sponge.


Greetings to all lovers of needlework! Under the influence of the pre-holiday fuss, I again joined the creative process of creating something new and curious. are original decorations with which you can decorate not only a festive Christmas tree, but also any space. The creation of such toys is a fascinating process that will appeal to both adults and children.
Last year I already introduced you to my first experience. I made balls using knitting threads. But I didn’t post the master class, but showed only the result. If you are interested in how they are made, then you can watch a detailed video in the article "".
Since I already have balls, although I gave away most of them last New Year, but I still have a few left, I decided to experiment a little more and made flat decorations from threads using this technique. This time, I will share with you the whole process and the result of my efforts.
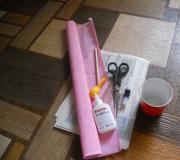
MATERIALS FOR CREATING NEW YEAR DECORATIONS FROM THREADS AND GLUE
Threads for knitting in different colors
PVA glue
Water
Needles with tips
foam tray
Beautiful round laces or ribbons
Various decorative embellishments (sequins, glitter, ribbons, lace, etc.)

The first step is to draw on thick paper the patterns of toys that you want to make and cut them out. I got them like this. I decided that I would make a ball, a house, a star and a Christmas tree.
After that, we proceed directly to work. For this I used a styrofoam tray. You can think of something else, but this item should be flat and well pierced with needles. One more moment. Since the thickness of the tray is not very large, and for work it is necessary that the needles sit tight enough, I placed a fabric folded several times under the tray from below. The needles pass through the bottom of the tray and penetrate the material. Thus, they are securely fixed and do not move under the tension of the threads.
At the bottom of the tray, you need to put stencils of future toys and mark with needles all the corners of the figure and some intermediate places (optional). The more needles, the more intricate and dense the pattern.

We take any deep plate and pour PVA into it. If the glue is thick, then it must be diluted with a small amount of water. The thicker the resulting liquid, the denser and stronger the toy will be as a result. We put the threads with which we will work in a plate and let them soak thoroughly with liquid. This is an important point, as unimpregnated threads will remain soft. And that's not what we need. But don't keep them there for too long. One minute is enough.
After that, we pull the thread by the tail and pull it between the needles in various directions. Create a chaotic geometric pattern. Please note that I made the Christmas tree from two colors: white and green. Initially, I pulled a white thread, and then a green one. Thus, the Christmas tree on both sides is a different color. I pulled the asterisk completely from red threads.

In the same way, I made a house and a ball. By the way, on the house, I additionally made a window. It is performed after the yellow threads for the main pattern are pulled between the needles.
This time, I did not wait until my toys dry naturally, but dried them with a hair dryer. This took some time. Do not pull out the needles during drying!
After the product is almost dry, it must be carefully separated from the tray and dried on the reverse side. Here is what I got as a result. In principle, they can be left in this form. But, I decided that I would make them more artistic and decorative.

This part of the process took me most of the time. I raked out what I have in my handicraft arsenal and began to come up with decorating options. As you can see, I used a variety of materials: a string of imitation pearls, sequins, silk ribbons, a pendant with a pebble, a golden ribbon, and even the remains of a bead attachment.


Each toy was hung on round strings. Here are the New Year's decorations from threads that I get as a result.


To be honest, I liked the Christmas tree the most. She is beautiful in her simplicity. The pearl garlands make it very dressy and a bit glamorous. I'm already thinking about making such Christmas trees as a gift to my friends, but only all of them are multi-colored. I am sure that they should also turn out beautiful and bright.
Find out even more interesting things:

A wreath on the head of decorative flowers with your own hands
Hair jewelry is very popular right now. They are worn by all female representatives, from small to large. One of the original accessories are wreaths and headbands, ...

Hollow balls of thread look unusual and very beautiful. Today we will tell you how to make them and offer some ideas for making Christmas accessories using this decoration.
Balls of thread can be used as an independent decoration for the Christmas tree, turn them into a sparkling garland, build a New Year's character from them, and much more. So arm yourself with threads, and then your imagination will do everything for you.

What will we need?
- threads of any color and thickness (fluffy should not be taken)
- Balloons
- PVA glue
- starch
Progress
Earlier we told you how to make a lampshade from threads. The technique for making these balls will be similar.

The main difference is that you do not need to inflate the balloons too much. Make them very small - the size of a fist. Inflate as many balloons as you need. And tie them somewhere so that it is convenient to wrap and dry the future craft.

In a bowl, mix one and a half cups of glue with a half cup of starch and a quarter cup of water. We dip the thread into a bowl and wind it around the ball in random order.

You can pre-lubricate the balloon with Vaseline to make it easier to separate it from the thread. However, you can do without it.
When the glue dries and the threads harden, you just need to pierce the ball with a needle and carefully pull it out through the hole.
Make as many balloons as you need to make the desired accessories. You can use them in different ways.

Balls of thread for the Christmas tree
This area of application is the most obvious, but no less significant.

Just attach the loops to your balls and decorate the Christmas tree with them. Additionally, various beads can be strung during winding. Before drying, the balls can be generously sprinkled with dry sparkles.
The thinner the threads, the more beautiful the jewelry. Regular sewing thread will work too.
Christmas tree from balls
We have already told you what beautiful compositions can be made from various Christmas balls. In any of the techniques described, you can use not only standard ready-made balls, but also homemade balls of thread and glue. For example, you can collect a Christmas tree from them. If not all, then at least part of it.

When making such Christmas decorations, it is better to use balls made from thicker threads - they are stronger.
New Year's interior decoration
Despite the obvious simplicity of the idea, the effect is simply amazing!

Make several balls of different sizes and simply place them on the windowsill. Scatter between them pieces of tinsel, various stars, gold ribbons. Place a few simple candles nearby (in this case, take precautions) or arrange a garland (less fire hazard, but still be careful). Turn off the lights and turn on the lights - the house will be filled with magic!
balloon snowman
And even your favorite New Year's character in this technique turns out to be somehow especially beautiful.

Fasten the balls with glue, and the hands need to be done separately. To do this, we need a thin wire and red threads. Fold the wire in the form of mittens, coat them with glue and wrap them tightly with thread.


Ready-made snowmen can be decorated with knitted hats, beads and other accessories.

Garland with balls of thread
One of the most beautiful accessories that can be made from these balloons.

Just be sure to check the garland for serviceability. In addition, it must be of high quality, and best of all - with additional protection against heating. Be careful not to overheat the bulbs. If you doubt that your garland meets all safety requirements, it is better to refuse this idea.
To make a similar garland with your own hands, you just need to push the threads a little, put the light bulb in and move the threads back. The main thing is that the light bulb does not come into contact with the threads.
Such a garland looks very beautiful on the Christmas tree, and on the wall, and on the windowsill.
Hanging decoration
Balls of thread can simply be hung from the ceiling.

If you don't feel like putting in the extra effort, just hang all your balloons over a table or door. It looks very unusual and impressive, adds comfort to the house.
Choose any of the proposed ideas or come up with something of your own. This Christmas decoration can be used in dozens of different accessories. And each will be beautiful in its own way.
Views: 3 489
Thread balls are an original home decoration that is easy to make with your own hands. Its production does not require large expenses, and the result allows you to feel like a real designer. Thanks to the simplicity and fascination of the process, making balls will appeal not only to adults, but also to children.
Important Rules
Before starting work, you need to familiarize yourself with the important principles of making crafts. Firstly, in order to create a voluminous toy, you will need a base on which threads should be wound. A balloon or a wire frame is perfect for this.

Secondly, to make a beautiful toy, you need fluffy pompoms. By gluing them together, it is easy to create the desired shape and volume. Pompoms can also be used to make ponytails or the fur of animal toys.
Tools and materials
Do-it-yourself balls of thread began to be made in the 90s, when it was difficult to find beautiful Christmas decorations for sale. By the end of the 20th century, the invention was forgotten, but now the original thread crafts are back in fashion.
To make them you need:
- threads;
- needle;
- several balloons of different sizes and shapes;
- 1-2 tubes of PVA glue;
- scissors;
- tassel;
- several cotton pads;
- light hand cream

Operating procedure
The following instruction will explain in detail how to make balls of thread with your own hands. Ready-made crafts can be used as an apartment decoration or New Year's decor. If you have any questions, you can always watch the tutorial video to get a clearer idea of the manufacturing process.

- Inflate the balloon so that its diameter is about 10 cm. Tie it tightly at the base.
- Using a cotton pad, cover the entire surface of the ball with cream. Thanks to this technique, in the future you can easily remove the base from the finished craft.
- Soak the thread with PVA glue. To do this, unwind the ball, and then loosely wind the threads again. Dip the whole skein into a container of glue. You can also do this: pierce 2 holes in a tube of PVA glue and pass the thread through the needle through them as the toy is made. Remove excess glue drops with a napkin.
- Start winding the ball by securing the thread at its base. Make sure that each subsequent turn overlaps the previous one. You may need an assistant here, for example, a child.
- After you have wrapped the entire ball, cover the end of the thread with a thick layer of PVA glue and hide it under the winding. Rate the work. If somewhere the threads do not fit tightly, you will need an additional layer of glue.
- Ready-made balls of thread should be hung to dry. This usually takes at least 20 hours. You should not place the craft near heating devices to speed up the process: the balloon may deflate.
- From the hardened workpiece, you can remove the base. To do this, pierce the balloon with a needle and carefully pull it out through the holes in the threads.

How to arrange balloons
The resulting blank can be decorated in different ways. To make the ball become a toy or a decorative ornament, you will need to show imagination. Children can be involved in decorating crafts.
Master class on making a Christmas tree toy: cover the ball with a small layer of glue, and then a layer of glitter (reflective particles used in needlework). You can decorate the workpiece with sequins, beads, appliqués, or apply any image to it using a stencil. New Year's balls of thread, covered with decorative varnish or spray paint in gold or silver, look gorgeous.

To make delicate openwork flowers out of a ball, carefully cut the blank with a knife, forming petals, bending them one by one. In this way, you can make spectacular tulips, lilies, lilies of the valley. If you have any difficulties in the process, see step-by-step photos of the process and a detailed master class.

With a little imagination, you can turn the balls into magical characters. Attach the tail and fins of gilded paper to the blank on a layer of glue, and you get a Goldfish. You can make more complex toys by painting the workpiece with acrylic paints and using various decor: colored paper, scraps of fabric, buttons, decorative pins.
When involving children in the creation of toys and decorations from balloons, be careful. These are very fragile crafts, so you should not give them to a child for games. However, you can decorate a children's room with finished products by making, for example, an openwork night light, an original garland or a pretty pendant on the ceiling. See the photo for other ideas for decorating a room with balls of thread.