How to stick a vinyl sticker. We decorate nails in various ways
Applications on clothes are very popular - they look stylish, beautiful and the clothes acquire an individual character. A nondescript blouse will become fashionable thanks to an applique sticker. A good hostess, fashionista or mommy should knowhow to stick a sticker on clothes with an iron.
There are different types of applications:
- hand embroidery;
- photo printing;
- rhinestones;
- emblems;
- children's;
- cartoon:
- reflective stickers.
There is a wide variety of stickers for sale for different styles and desires. The main thing to knowhow to stick a sticker with an iron right. There are many different subtleties that you need to know, especially for a beginner.
The main features of applying stickers:
- Type of fabric. It is better to choose a natural fabric, such as 100% cotton. Denim material remains an excellent basis for gluing emblems. It is recommended to sew stickers on other fabrics.
- The application surface must be flat and firm. Otherwise, it will not be possible to stick the sticker evenly.
- Iron coating a very important detail, which is responsible for the quality of ironing small parts, pressure on the material and the absence of sticking properties.
- Having chosen a sticker, you need to carefully cut it as close as possible to the edging. After, the prepared sticker is applied to the material. The fabric should be well smoothed and not have any seams, folds and wrinkles.
- It is recommended to warm up the fabric in advance - this way the adhesion of the base and the appliqué will occur faster and better.
- The iron heats up to the maximum allowable temperature. Steam mode must be turned off.
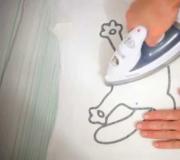
- A clean sheet of paper is laid on top of the emblem and held with a hot iron for 10-20 seconds. Do not touch anything immediately after the procedure. Only when everything is completely cool, the paper is removed.
 Often there are largestickers on things, how to stick them with an iron
many do not understand. Of course, this task is a little more difficult than the previous one, but it is doable. Gluing a large application is easier if you have already had experience with a similar procedure. In this case, the sticker is ironed in detail, with the maximum load on the iron. The main thing is to iron all the details consistently and evenly. The rest should be supported by standard recommendations.
Often there are largestickers on things, how to stick them with an iron
many do not understand. Of course, this task is a little more difficult than the previous one, but it is doable. Gluing a large application is easier if you have already had experience with a similar procedure. In this case, the sticker is ironed in detail, with the maximum load on the iron. The main thing is to iron all the details consistently and evenly. The rest should be supported by standard recommendations.
The sticker has advantages not only in an aesthetic form, but can also help hide various errors. If the product has an unsuccessful seam or hole, a decorative sticker will help out.
It happens that misfortune happens with outerwear. You should not despair. Just need to knowhow to stick a sticker on a jacket with an iron . This will require interlining and thermal sticker a little more than a hole. A piece of interlining is inserted inside the hole and carefully smoothed out with an iron. The torn tissue is immediately connected. After that, the desired application is glued to this place according to the standard scheme. The technology of applying applications to clothes is not too laborious and does not require certain skills. At the same time, everyday clothes will stand out favorably.
Devoting time to nail service is traditionally done in salons. But the pace of life and increasing costs lead to the search for solutions on how to create a manicure on your own so that your hands look well-groomed and graceful. You can show individuality and creativity with new nail art techniques by decorating nail plates with special stickers.
stickers
Film coatings have become an alternative to the usual nail polish. The ease of application and the richness of the choice of patterns, patterns, textured varieties make home manicure popular.
The main rules and procedure for how to use nail stickers are as follows:
- Prepare the nail. To do this, you will need to remove the cuticle and polish the surface with a buff for reliable adhesion to the film coating, and then degrease.
- Remove the protective sheet from the sticker and apply the adhesive side to the nail.
- Gently and thoroughly smooth the coating with a wooden or plastic spatula to remove any air residue.
- The edges, if necessary, are trimmed and processed with a ceramic or glass file.
Methods for gluing stickers on gel polish differ in the additional use of a top.
Types of stickers

The types of stickers are distinguished by the following parameters:
- the size of the nail cover;
- design features;
- application methods.
By size, there are 2 types of stickers: covering the nail plate completely and partially.
Among the options with full coverage, or stickers for the entire nail, there are:
- Application (transparent, one-color, with a rare arrangement of the pattern);
- Manicure (with an image covering the entire space).
A single-color film, or “dry varnish”, allows you to do without the usual salon procedures and the need to patiently dry your nails. The choice of film prints is huge: in color, style, texture. The creation of a three-dimensional surface is a separate direction - 3D nail stickers, otherwise such a coating is called beaded.
Three-dimensional stickers are elements with a convex shape. This model is used for special occasions. In everyday life, three-dimensional design is less practical than flat options.
A separate place among the varieties of stickers is occupied by photo-mini-images. Designer's search for color collages from photographs and pictures is always unique and original.
Sets of self-adhesive tapes of different widths and colors have gained popularity. It is more convenient to work with the thinnest stripes for creating decor on different bases: varnish, gel or acrylic. Decisions on how to glue the tape on the nails will be prompted by the shape of the plate, style matching with the image and fantasy.
For extended nails, special ornaments have been developed. They are large in size and are designed for combination options or a holistic design of the nail.
Gluing method

Stickers are thin and fragile, so careful handling of the material is required. Placement of the picture should be done strictly in the center and monitor the fixation of the image.
Manicure with stickers is applied in different ways. Among the first were water-based nail stickers that looked like baby decals, and then fashionistas learned how to apply nail stickers with aliexpress.
Before pressing to the nail, you need to hold the image in warm water. After carefully peeling off the paper part, the film with the pattern remains in place. After drying, it is required to cover the nail with a fixative varnish. It is almost impossible to distinguish transfer stickers on nails from the salon work of the master.
The second way is universal. Even teenage girls know how to properly glue stickers on nails if the surface is sticky. It is necessary to carefully attach the film on the base dried base varnish with the right side, and the process is completed. Additionally, it is recommended to cover the nails with a finish varnish to strengthen the result and prevent the rapid abrasion of the decorative layer.
If a mistake is made and a distortion of the pattern is observed, then you can correct the flaws using
- beads, rhinestones, acrylic paint or shiny varnish;
- replacing the picture with a new one.
Experience in application will tell you how to peel off the sticker and re-shape the nail. The decor technique is clear and accessible.
Foil
In new and unusual design experiments, manicure foil has become an indispensable material. It differs from the usual one in that it lies flat on the surface of the nail, is attached with a varnish, gel or sticky base. Foil on nails is popular due to its unique original shades.


You can choose the desired type of foil from the various options presented in the nail service:
- transfer sheets and rolls - for manicure work you will need a gel with a sticky layer or special glue;
- sheet foil - used both for cutting out individual figures and patterns, and for creating a casting layer;
- embossed - suitable for complex structural design;
- compressed - ideal for aquarium design, reminiscent of gold leaf;
- in stripes - simple ribbons on a sticky basis with a wide range of colors give scope for fantasy patterns;
- minx - thermal stickers for nails with an unusual effect.
Gluing method
Information on how to glue foil on nails can be obtained in the accompanying instructions for purchase and from consultants in salons-shops. There are no big secrets in this art, but it is useful to learn small tricks.

Before sticking the foil, you first need to remove the previous varnish coating, polish the surface of the nail plate. Then, elements of the appropriate shape and size are prepared for each nail. The backing should be peeled off and gently pressed against the nail. In the process, it is recommended to straighten the layer and prevent air bubbles from entering.
The methods for applying foil to nails are approximately the same when it comes to the adhesive base. Blanks can be individual for each finger or consist of fragments for cutting shapes.
You can complement the manicure with foil with beads, broths, rhinestones or acrylic painting. And after that, the decor elements are covered with a protective compound.
The desire to perform a manicure on your own should be combined with a manifestation of taste and knowledge of how to glue broths on nails or achieve a casting effect. A sense of proportion is very important in such an exciting and creative process.
The transfer foil is always glued onto the prepared base: after the base varnish has completely dried, a special glue is applied (you can buy it together with the foil) and wait a little until the glue becomes more transparent. Then a piece of foil is applied with the matte side to the nail, smoothed and sharply torn off. The result will be mirror nails.
Stickers
Gluing stickers is much easier than painting a small nail and wasting time on the stages of drying and applying layers of painting. Design techniques retain their original appearance for a long time and delight with beauty.

Using stickers yourself and teaching others is a fun and creative activity. In order for the decor of the manicure to match the overall style, it is important to decide on the choice of the appropriate “clothes” for nails.
Types of stickers
Stickers, or overlay plates, amaze with the variety and number of patterns for any exit or event. It is customary to distinguish between two main types:
- flat;
- voluminous.
Stickers differ in the way they are applied:
- water;
- adhesive.
Water stickers are transferred to the nail plate after soaking. The period of wearing a manicure is increased by using a shellac coating, a special dense gel.

Adhesive art stickers are difficult to distinguish from a professional result. The carved design goes well with a monochromatic manicure. Lace stickers are ideal for special occasions: weddings, anniversaries, corporate holidays. As a rule, the side or extreme parts of the nail are artistically decorated. The combination of white lace with contrasting varnish adds expressiveness to the whole image.
Acrylic or metal nail stickers give the right accents, complement the created pattern, are diverse in shades and species associations.
For French manicure, French stickers are presented in classic white and its shades.
Volumetric stickers are presented in options:
- based on gel layers, including silicate ones;
- from polymer clay (fimo-stickers);
- visual effect of three-dimensionality (3-D-stickers).
Soft and flexible decorations convey three-dimensional images from flowers and butterflies to cartoon characters. Special clay is sold in the form of cut fragments, from which you can create a small masterpiece of a personal manicure.
A few tips:
- three-dimensional color drawings are suitable for romantic meetings;
- ladybugs and butterflies are appropriate for young girls;
- rhinestones will add brightness to the image in the evening at a festive event.
Gluing method
The technology of applying stickers is familiar to those who already know how to make sliders on nails, which are a transfer film.
After treating the plate with an antiseptic, you need to apply a base coat of varnish. A light shade will emphasize the brightness of the applied pattern. After soaking the pictures for 5 minutes, the film is removed and the sticker is applied to the manicure. It is recommended to fix the result with a transparent varnish. Transfers on nails, as such fashionista stickers are called, will last up to two weeks.
Stickers can be glued with a dry layer of base varnish or special glue. You need to apply the first time and with pleasure, then the decoration will fit evenly and will fit snugly against the nail plate.
It is necessary to deviate slightly from the cuticle and the sides of the nail, by about 1 mm.
Volumetric decorations
Working with voluminous stickers or details requires accuracy, but the result is worth the effort.

Kinds
The main details of the volumetric decor are rhinestones, bouillons, loose glitter, beads, golden mesh or acrylic figurines.

In everyday life, volumetric design is not used. In solemn occasions, this is an original and creative solution. Execution is done on one or two fingers, if these are large protruding ornaments in the form of flowers or figures. Bouillons, beads or glitter can occupy the entire surface of the nail. Playing with color is used to accent or fix images.
Gluing method
Individual elements must be placed on a work sheet of paper before gluing. Then it will be easy to collect the remaining small beads or figures from it.
For applying volumetric details, a special gel polish is convenient to use. How to glue rhinestones on gel polish, you can learn from the following recommendations:
- apply rhinestones on the second or third layer of gel polish;
- use a magnetic pencil to maintain the planned order;
- dry each layer;
- with a thin brush, fix the protruding elements with a layer of top.
Bouillons are attached "wholesale" if a caviar manicure is conceived. To do this, a finger with a dry layer of base varnish should be dipped into a jar of bouillon balls or simply sprinkled on a handful of “caviar” on the nail.
The surface of small beads must be pressed gently with a finger or secured with a finishing varnish.
Let the result satisfy expectations and bring joy.
Today, there are different methods of tuning a car, but most of the options require serious financial investments.
Let's consider in more detail the external tuning of a car with the help of car stickers!
Stickers are one of the easiest and most inexpensive ways to add some zest to a car, attract attention, and inform others about the special status of a car.
Depending on the purpose, there are such types of stickers as:
- Graphic car stickers - a variety of graphic drawings and collages give free rein to self-expression and more subtly emphasize the inner world of the car owner.
- Promotional - contain information of an advertising nature, for example, about the sale or purchase of goods with contacts.
- Informational - these include stickers of taxi services, driving schools, government agencies.
- Signs - they are glued, for example, novice drivers or parents carrying a baby in the cabin.
- Humorous - you must have met motorists on the roads whose cars have inscriptions like “I often confuse pedals” or “First day behind the wheel”.
Films (glossy and matte) are also divided into:
- special high-quality (designed only for application on glass),
- reflective (visible at night),
- light-accumulating (accumulate the energy of sunlight during the day and give it away at night in the form of a beautiful glow).
How to stick a sticker on a car - step by step instructions
For self-gluing, you will need the following tools:
- glass cleaner, as well as a special tool if there are bitumen stains on the car,
- a clean rag made of synthetic suede,
- mounting tape,
- ruler or tape measure
- squeegee or plastic card,
- scissors,
- It is advisable to take a friend to help.
The temperature indoors or outdoors must be at least +10C. It is undesirable to carry out work in rainy wet weather.
Operating procedure:
1. Spray the glass with a glass cleaner and wipe it dry with a cloth.
If the situation suits, we apply a couple more strips of fixing film. Instead of a mounting film, you can use ordinary mounting tape. To make it easier to stick the auto-sticker, it is better to place the fasteners on the side of the central axis. This will allow you to stick first one half of the sticker, and then the second without creases.
3. Unfasten the fasteners on one side and start remove backing from sticker. We bend the edge of the substrate and begin to carefully remove it. We do this until the middle of the sticker.
4. We glue half of the sticker and iron it with a plastic card, moving from the center to the edge. When “bubbles” appear, the unsmoothed part can be peeled off and corrected.
5. Remove the fastening tape, since the sticker is already securely fixed.
6. Remove the paper backing from the second half of the sticker.
7. Glue the second half to the glass and iron again with a plastic card.
8. Peel off the transparent layer and slowly pull along the surface. We make sure that all the elements of our drawing remain on the glass.
At the end of the work, we iron a couple of times with a plastic card on the surface.
VIDEO INSTRUCTION
- Rectangular and elongated stickers are easier to start sticking from the narrowest side.
- Within 2 weeks, do not wash the glass under a pressure washer. This is necessary so that the adhesive layer has time to fully polymerize.
- On the first day, give up fast driving - there is a high risk that the work will have to be done again.
- If you decide to remove the sticker, heat it with a hair dryer (you can use a regular one, but an industrial one is better), and then it will come off easier. The adhesive remaining after removal can be removed with a solvent and a rag.
- On dark-colored vehicles, the outline of the sticker will remain visible, as the paint will burn out a little during this time. To prevent this from happening, change the location of the sticker every six months.
- Expect that the average life of the film is about 2 years.
Beautiful nails and flawless manicure are the dream of any woman. This is not only a sign of grooming, but also a way to stand out from the crowd, to show your individuality. Today, the nail industry market offers a lot of original products, with the help of which any manicure acquires a special style and allows a woman to be in the spotlight. One of the most spectacular attributes of a perfect nail cover are sliders. What are their features and how to glue such stickers on gel polish?
Features of the decorative element
Nail sliders are one of the most popular manicure techniques. This term, translated from English, means "slide". These are special stickers, which are thin films with a pattern of various subjects. Due to the special composition, such films are securely fixed on the surface of the nail plate.


Slider design successfully replaces art painting, it looks flawless. Applied to gel polish and coatings on top with a fixative, it prolongs the life of a manicure, while not losing color saturation and glossy sheen.
The advantages of such a nail product include ease of use: you can design nails with stickers not only from a professional master in a beauty salon. Such pictures can become an adornment of all fingers or show off only on a few, which looks no less beautiful and impressive. They can be of different sizes, completely cover the surface of the nail plate or only the part chosen for the design. Such pictures are also appropriate on the jacket, if you stick them closer to the base of the nail.


Observing certain rules of application, you can decorate your nails with a manicure with sliders yourself at home. This saves time for painting nail plates, allows you to create both a full-fledged manicure and an emphasis on one finger.
Decorative stickers are safe for nails. They do not harm their structure, are applied easily and are rarely capricious when removed. In addition, sliders are freely available in many specialized stores, so it will not be difficult to buy them according to your preferences.


Such nail decorations have a wide price range, which allows you to choose both luxurious and expensive ones (from 500 to 1000 rubles) and more acceptable drawings (20 - 100 rubles), which are not inferior in beauty to expensive counterparts.
Depending on the type of stickers, they have different ways of gluing. Each technology has its own nuances, the violation of which will lead to the loss of an impeccable type of manicure.
The subject of the drawings
Colorful pictures can be bought at any cosmetic boutique. At the same time, their subject matter often strikes the imagination and baffles: you want to buy everything, no matter how beautiful it is. The most popular image motifs on such design elements are:
- animalistic drawings (all kinds of kittens, dogs, snakes, tigers, panthers, leopards, bears);
- birds (peacocks, seagulls, birds of paradise);


- ornaments (geometry, scalloped lace, stripes);
- prints (floral, abstract patterns, compositions with butterflies, reptile skin designs and animal skin color);
- lace (web, all kinds of lace patterns, made in one or more shades, imitation of textile textures);


- portraits (famous people, female faces, silhouettes);
- cartoon characters (relevant for young people);
- Japanese patterns (sakura, geisha, anime sketches, etc.);


- New Year's theme (snowmen, snowflakes, bullfinches, deer, Christmas compositions);
- fruits and berries (various patterns with one or more items);
- rock style (skulls, crosses and similar paraphernalia);
- glamor (hearts, bows, stars, gold or silver letters).


Patterns can be colored, monochrome, flat, with a small relief. Some drawings imply symmetry, others do not need it. Today, a free theme is more often used, in which accents are glued to just a few nails.
Kinds
Today, the choice of such products is quite wide. There are many varieties of stickers for nail design.

Aquatic
Water stickers are a thin film located on a white paper base. A feature of decals is the need to be based on a translucent base, so they need careful selection of the shade of varnish. The background should be in harmony with the color palette of the pattern and not merge with it into a single incomprehensible spot.

The disadvantages of this type of stickers include the likelihood of damage to the workpiece in the process of fitting it in size and shape.
Self-adhesive
Such drawings are a photo design (fragments with an adhesive surface located on a special substrate). Their feature is independence. In order to stick them, it is enough to separate the sticky layer and stick the fragment on the surface of the nail.


By themselves, stickers can represent individual items of a particular pattern or be a full-fledged object. They come in the form of a variety of sets of 10 plates, designed specifically to cover the entire area of the nail. The sets created for the jacket are made in the form of stripes.
3D
Stickers of this type differ in volume. They are slightly convex, unlike the usual flat pictures. This kind of sliders can be a full-fledged decorative element or a nail accent.


These stickers are water-based and adhesive-based. In general, they are not difficult to work with, although sometimes difficulties may arise (when designing a manicure on the entire area of \u200b\u200bthe nail). The presence of a small relief (bulge) does not interfere with everyday life, it does not scratch or cling to clothes and other objects.
The advantages of 3D stickers include the ability to combine them with other decorative design elements (such as regular stickers). They are easy to use and often look more beautiful than their counterparts. The disadvantages include the difficulty of removing the sticker when removing the coating. Special gel polish removers are not designed for such procedures, so this sticker will have to be scraped off.

Application methods
There are several methods for applying nail stickers. Each technique is unique in its own way, so you can choose the most optimal option. Implementing a slider design step by step is actually much easier than it might seem at first glance, it does not take much time.
Water based
The sliders are cut to the size of the nails, then lowered into the water. You can use a napkin soaked in water, attaching a cut-out fragment to it on one nail. The film with the picture will peel off easily in both cases.

On uncured gel polish
One of the most reliable slider design methods is the method when pictures are applied to a non-dried layer of pigment. Experienced craftsmen advise using a brush when smoothing the sticker. So the drawing will not tear and lie flat on the surface of the nail plate. The brush allows you to tightly fix the sticker to the base without air bubbles and waves.


The advantage of this method is excellent durability, as the coating layer dries along with the slider. The adhesion of the slider to the coating with this gluing option will be as strong as possible. Therefore, in this case, one layer of fixative (finish) is sufficient.
On top with a sticky layer
This method is very convenient and the easiest. Sliders are applied to the topcoat layer after the pigment. Unlike the base coat, the top coat has a denser and thicker consistency, which simplifies the procedure for applying pictures to the surface of the nail plates.
The sticker is straightened with a brush, and then fixed with a top coat. It is necessary to try so that the size of the sticker, if possible, does not go beyond the lateral borders of the nail plate.

For a finished manicure
This method allows you to update an already finished manicure. If the nails are painted with gel polish, but after a few days you want a change, this is the perfect solution. At the same time, it is not necessary to remove the old coating at all in order to change the design of the nails.
In this case, in order not to create an extra thickness of the coating and an unnatural look, it is better to stick the slider design on an ultrabond (acid-free primer). It does an excellent job of fixing stickers and will not create obstacles in work. After completing the design, you need to fix the manicure with a top coat without a sticky layer.

Photo design for long nails
In the process of work, you need to trim the stickers in shape and size that is most suitable for each specific nail. However, it is not scary if the film protrudes beyond the edge of the end of the nail: then it can be cut with scissors and, after drying, processed with a file.

Straightening the slider design with an elastic brush, you need to remove all voids. If the sticker does not fit well on the surface of the nail, small cuts can be made. Some experts use an orange stick to straighten the film with the design.
After gluing the film, it is fixed with a layer of topcoat without a sticky layer. It is better if the top is glossy: the look of the pattern will be more attractive. In addition, you should not stick such pictures on a dark base if the picture is faded and made in translucent muted colors.

Working with slider design will appeal to every woman, no matter what method of gluing pictures is chosen. The duration of the procedure will not take more than 10-15 minutes, provided that the work will be done calmly and accurately.


Not every experienced master can draw such patterns, and for much more time. The main rule of all stages of design is accuracy at every step. The technique of gluing water-based sliders is somewhat reminiscent of decoupage.
How long should you keep?
With the proper execution of the design, the stickers stay on the nails for at least two to three weeks and even more. The durability of such a manicure is affected by careful handling of the coating. This is especially true for household work, during which hands come into contact with water and aggressive detergents and chemicals.

In order not to have to wonder why the stickers do not stay on the nails for a long time and the beautiful coating quickly peels off, you need to follow all the rules of manicure with gel polish at each stage. It is important to perform all actions carefully, without defects. Any slightest imperfection in bonding will spoil the flawless appearance of the nails and eventually lead to the fact that the coating will have to be removed.
In addition, the durability of the colorful design with stickers is affected by the use of quality components in the work. It is better to buy gel polishes from reliable companies that are time-tested and have positive feedback from experienced craftsmen working with this type of coating.
The coating may shorten the durability in case of hormonal changes in the body during pregnancy. In addition, stickers may stay on the nails less if the nail plates themselves are unhealthy and very thin. A special strengthening gel can help thin nails, which does not need to be removed later by cutting.
How to translate at home?
Gel polish slider design technology requires knowledge of the techniques of the masters working in the salon. To prolong the life of a colorful design, you need to correctly and step by step follow all the instructions, starting from the very beginning.

Before applying the base coat, it is necessary to treat the nails and do a light manicure without soaking. In this case, it is necessary to remove the cuticle, trim the shape of the nails, carefully process the free edge of the nail. Not only the quality of the coating, but also its durability depends on how even it will be.
In addition, you need to consider that the perfect manicure implies the same length and shape of all nails. If oil or cream was used in the treatment of nails, they must be removed.

After that, the surface of the nail plate must be polished with a soft file for natural nails (bafa). This should be done delicately, removing only the gloss. If you press hard on the buff, you can damage the structure of the nail, removing not only its natural protective layer. Filed nails will look matte.

The next step is to use a degreaser (dehydrator). It will remove the residual sawdust after grinding and the remnants of cream or oil, if they were used at the very beginning. At this stage, it is important to pay special attention to the end of the nail, the inside of the free edge and the side ridges. If an untreated area remains, it can lead to a violation of the resistance of the coating.
Having completely removed the keratin layer, you need to use an acid-free primer. It is especially necessary in cases where the nails are thin and soft. This component of manicure helps to improve the adhesion of coatings to the surface of the nails, strengthening their structure.
After preparing the nails for coating, apply a base coat. It should be thin, evenly distributed over the entire surface of the nail plate. It is important not to forget about the end of the nail and the sides. The base coat has a sticky layer, which must not be touched: it makes the adhesion of the nail to the pigment maximum. When working, you need to try to do everything carefully so as not to violate the integrity of the coating.

A distinctive feature of the entire manicure using gel polish is the need to dry each applied gel-based layer. Imperfections must be removed before polymerization in a UV or LED lamp. A thick layer can quickly crack, which will affect the quality and durability of subsequent steps.
Buying a special lamp can confuse unenlightened shoppers. However, this is an important tool for manicure, because it is thanks to it that gel polish, base and top harden.

You can purchase a budget version of a compact size lamp. It is not necessary to buy a powerful device for drying two hands at the same time: at home, a neat device purchased at an affordable price is quite enough.
After the base coat, a colored gel polish is applied. It usually has good dense pigmentation, so one or two thin layers will be enough for an even background without stripes and unpainted areas. After applying each layer, they are polymerized in a lamp. Drying time depends on the type of lamp.
The LED device is more powerful and reduces the overall time for creating a manicure. Drying of one thin layer in such a lamp is 10-30 seconds. However, manufacturers often produce nail products that are not designed to work with it. In this case, it is better to buy an ultraviolet lamp, it is a universal device for all types of coatings. The polymerization time of one thin layer in it is 2 minutes.


Sliders are glued to the prepared surface. Their design can be the most diverse, it depends on the imagination and style of the intended composition. The method of applying stickers differs from their varieties. This process is very exciting and creative. By gluing pictures, they can be decorated with small rhinestones and microbeads.
After the slider design, you can apply the finishing layer. The top is a fixer, it is applied in a denser layer, and therefore it dries a little longer. The polymerization time in the LED lamp of the top coat is 1 minute, in the ultraviolet - 3-4 minutes.
It is worth noting that UV lamps differ in power. When buying such a device for home use, it is better to choose a model with a power of 36 watts. This is the optimal value so as not to harm the manicure and not disturb the water balance of the skin.
In addition to observing all the above rules, experienced craftsmen working in the nail field recommend choosing the main shade for stickers. thoroughly.
- If white is chosen, it is desirable that it be pure, without impurities. It is better to glue bright and attractive stickers on such a background. Such a base is ideal for any slider design, as it can make drawings richer.
- One of the actual shades of gel polish for pictures are flesh and beige-pink tones. Thanks to light shades, the picture will not lose its expressiveness and will be clear.

- When choosing a contrasting background for drawings, it is important to consider the color combination. The shade of gel polish should be a harmonious basis for the pattern.
- Before starting work, you need to prepare the necessary tools so as not to be distracted by searching for them during the manicure.

- When designing with water stickers, it is better to use warm water: this way the film will move away from the substrate faster.
- If the picture lay in the wrong place, as it was intended, do not try to move it. In this case, there are two ways out: redo it all over again or try to fix the defect with the help of other decor elements (rhinestone, sequin).
- A fully finished manicure should be protected from contact with water for at least half an hour after drying the finish layer.
- In order for the slider to be a durable and high-quality nail decoration, you need to pay special attention to sealing the free edge of the nail. You must not forget about it with each layer of coating, otherwise the stickers will begin to peel off after a few days.

Problems at work
Sometimes performing all the steps step by step, it is not possible to achieve an impeccable result. The reasons for this usually lie in the following:
- If the sticker falls off along with the topcoat layer, then the reason lies in the fact that the top coat or varnish layer has not dried well.
- The formation of wrinkles on the surface of the picture indicates that the quality of the sticker is low or its film is thick. However, the reason may be that the slider is too wet.

- Chips in the top coat may indicate that it lacked the minimum clearance on the side bolsters.
- Flaking of the coating may be caused by insufficient sealing of the butt of the nail. This is a mandatory step of the manicure, which is needed to form a kind of pocket that holds the sticker.
Stickers on glass or car body must be applied according to the technology. There are two such methods - "dry" and "wet". The first one is better to use for small stickers, and the second - for canvases with a large area. As for the question of how to remove stickers from a car, special tools and compounds are used for this - a building hair dryer, gasoline and other means. Which ones - you will find out further by reading the article to the end.
How to stick a sticker on a car
Depending on the material of the sticker, its size, and the place where you plan to stick it, the methods of this process may vary. There are so-called "dry" and "wet" pasting methods. Let's start with the last one. If you plan to glue a large area vinyl film, then for this you will need the following materials:
- directly sticker;
- detergents for the surface of the car (car shampoos or similar compounds);
- soap solution;
- stationery knife or scalpel;
- plastic spatula;
- needle;
- (it is best to use alcohol or vodka, it is better not to use solvents, as they can damage the car's paintwork);
- building or household hair dryer (preferably building).

Using soapy water and a hair dryer
It is worth paying attention to the environment in which the work is carried out. The temperature in the room must be at least +10°С, the air must be dust-free and there must be no drafts. The next operation takes place in several stages. The first of them involves surface preparation, the second - fitting, the third - application, the fourth is the gluing itself and the elimination of defects. All work is performed according to the following algorithm:
- The surface to be pasted must be thoroughly washed, remove grains of dirt, grains of sand and other debris. Any, even the smallest particle that has fallen under the sticker will be visible, which will spoil the appearance of the surface.
- Try on the sticker to the surface. If her canvas is large, then it makes sense to glue it in parts. In this case, decide into which parts you need to divide it. In this case, it is necessary to proceed from the considerations that it is necessary to glue flat surfaces first of all, and then convex ones. After that, the joints between them should be processed.
- Separate the paper base from the sticker.
- Apply a soap solution to the adhesive surface of the sticker, as well as to the surface of the car where you plan to stick it.
- Gently apply the sticker to the surface. Soap solution will help you align it in case you didn’t manage to glue it evenly the first time.
- Using a rubber spatula, gently smooth it out, starting from the center and out to the edges.
- Remove the top protective film from the surface without damaging the auto-sticker and without peeling off the adhesive layer from the main surface.
- If an air bubble has formed under the sticker, it is necessary to carefully pierce it with a needle so that the air comes out.
- If the film is pasted at the joints of the doors, then it must be cut with a clerical knife.
- The final stage consists in heating the surface with a building hair dryer to a temperature of +60...70°C. This is necessary so that the sticker becomes soft, and it is easy to bend it at the joints.
Don't overdo the temperature. Otherwise, the sticker may simply melt.
The first few days (up to about 10) after gluing don't want to wash the car. It takes some time for the glue to dry completely.
- directly the sticker that is planned to be pasted;
- glass cleaner and rags;
- mounting tape;
- ruler or tape measure;
- scissors;
- rubber spatula, plastic card or other object with a flat edge (optional).
Work is carried out according to the following algorithm:

“Dry” gluing method
- First of all, you need to thoroughly wash the glass surface where you plan to place the sticker, remove particles of debris and sand.
- Next, place the sticker in the planned place and secure it to the upper corners with mounting tape.
- Using a ruler or tape measure, align the sticker, check the symmetry. If necessary, move the sticker and reattach with tape at the corners.
- Attach a strip of mounting tape in the middle of the sticker vertically. Remove the tape from the top left corner of the sticker.
- Lift the left half of the sticker and separate the backing from it (up to the mounting tape). When doing this, make sure that the mounting tape is aligned with the pattern.
- Cut off the separated piece of backing and set aside.
- Using a spatula or card, begin to carefully stick the sticker, moving from the center to the edges. Make sure that no air bubbles form.
- When half of the sticker is pasted, remove the mounting tape from the middle and right corner of the sticker.
- Remove the remaining backing. When doing this, make sure that the mounting tape is aligned with the pattern.
- Glue the right side of the sticker in the same way. Act carefully and carefully. Make sure there are no air bubbles.
- When the entire sticker is installed, remove the mounting film from it. It's best to do it at an angle.
Stickers on the side of the car are installed in the same way. The main thing is to always act carefully and not rush. However, car owners often wonder not only about applying, but also about removing the sticker from the surface of the car, as well as the adhesive residue from it.
How to remove a sticker from a car

Using a hair dryer to remove the sticker
We will analyze in detail how to remove the sticker from the glass of the car or its body. First of all, you need to know that there are different types of stickers, but vinyl ones are the most popular among motorists.
You need to start the story with the features of vinyl stickers. The fact is that they are produced on the basis of vinyl (a chemical compound that is resistant to moisture, temperature extremes, and so on), which has excellent performance properties, durability, strength, and resistance to external influences. Stickers are produced disposable, and their glue is designed for operation within 2-3 years. After that, it polymerizes, and the sticker itself shrinks. In addition, its surface is often covered with cracks, and when you try to tear it off, it breaks off into small pieces.
Another common type of stickers is paper-based. They are cheaper, but not resistant to moisture and temperature extremes. However, they are often used for gluing on the inside of glass.
If your car has a dark tint and the sticker has been on it for a long time, then it is likely that after removal, the tint in its place will be darker than on the rest of the surface.
A popular way to remove a sticker from a car body is to heating it with a hair dryer. At high temperatures, the material becomes soft, and if it is not very cracked, then there is a good chance that it can be removed in one piece. The metal must be heated evenly. As it cools, it is necessary to periodically maintain the temperature. Remember that the higher the temperature of the metal, the less likely it is that adhesive residue will remain on the surface. However, do not overdo it with this, otherwise you may damage the car's paintwork.
How to remove adhesive residue from the surface of the car and glass
Adhesive residues can be removed by first moistening them with alcohol or alcoholic mixtures. Be careful when using different solvents. Read the ingredients beforehand to make sure they won't damage your car's paintwork. In particular, in this case do not use solvents based on acetone, both directly and by acetone itself.
You can also remove after vinyl stickers on a car using:

Comparison of various adhesive removers and adhesives
- gasoline;
- kerosene;
- removal fluids;
- silicone solution to remove glue from the body;
- paint degreaser.
After using the listed liquids, do not forget to use foam (soap solution) to wash off their remnants. Also, some car owners in such cases remove the remnants of glue with very fine sandpaper (“zero”). However, after that, the problem area will need to be polished with a polishing paste. In stores, you can find a special rubber roller that is put on a drill. It can also be used to effectively remove pre-softened glue.
Results
Sticker film on the car is not particularly difficult. This is especially true for small labels. Almost any car owner can handle this. Another thing is if you want to use vinyl stickers on the car all over the body (for example, “carbon look”). In this case, it is better to seek help from the masters.