How to make small ones with your own hands. What you can do with your own hands for sale: handmade business ideas
Today you will learn how to make a yo-yo toy with your own hands at home. We have prepared for you three step-by-step instructions that describe the principles of making these toys from three different materials. We will make yo-yos from cans, plastic lids, and also from a wooden spool of thread. As you can see, all materials are quite accessible, so choose the one that seems most convenient for you to work with.
Today, manufacturers offer us different types of yo-yos: standard or LED plastic, aluminum, less often wooden. The choice is really big. Recently, however, homemade yo-yos have become more and more popular: such toys are assembled by hand in just a few minutes and are popular with children of school and preschool age.
Spool-of-thread yo-yo lessons are often offered in children's art classes as part of learning the history of woodworking and gaining practical skills. Such toys are valued for their natural safe body. Homemade yo-yos made from corks and cans are popular among high school students and are often the subject of competition. Plastic cork toys are also most commonly used by children and beginners as they are lightweight and easy to handle.
The history of these homemade toys in Russia began during the Soviet era, and now the fashion for them has returned. Try and make a yo-yo at home - it's a very good anti-stress!

Wooden reel yo-yo
This is the easiest way to make this toy. It is assembled literally in 5-10 minutes, and serves for a long time.
We will need:
- wooden spool of thread;
- nail;
- rope (about 1 meter).
Instead of a nail, you can take any other metal rod. The main thing is that it sits tightly inside the coil and evenly weights its edges on both sides.
We remove the middle part of the wooden spool, where the threads were previously located. We place the rod in the inside of the future toy (another option is to simply glue the side faces). It remains only to tie a rope to the yo-yo.

A little tip: if you are making a toy for a small child, tie a rubber band to a homemade yo-yo, not a thread. So the reel will jump better and the child will not be upset that he cannot play with the yo-yo.
Yo-yo from a tin can
A yo-yo is a toy that needs to bounce well and be fairly light on the edges and heavy in the center, so it makes the most sense to make it out of a tin can. In words, it sounds difficult - in fact, everything is very clear and accessible. Step-by-step instructions will help you make sure that making a yo-yo yourself at home is not at all difficult.
We will need:
- tin can (2 pcs);
- simple pencil;
- Super glue;
- rope (about 1 meter).
We will make yo-yo from the top of unopened cans (or from the bottom, if the bottom of the can is flat). First make a side cut in a full can of soda with a knife and pour the contents into a glass. Next, cut off the top so that the height of the edges is 1 cm. Rinse and dry the two halves of the future yo-yo.
We fix the first part to the center of the pencil with superglue. Then we bend the edges inward with a hemisphere and process them with a file so as not to cut ourselves during the game and not to break the rope.
We do the same with the other half.
The pencil will serve as a weighting agent, and the two hemispheres will be responsible for the jumping ability.

By the way, you can make a yo-yo from the side faces of a tin can. In this case, you need to cut out two identical circles and bend them inward, then plant them along the edges of the prepared pencil and fix them with Liquid Nails glue. Otherwise, the assembly principle of the toy remains the same.

Cork yo-yo
Do you want to make a yo-yo for a child? This option is for you, because the toy is very light. Also, these yo-yos will be fun for beginners to play. Well, it is done in just a few minutes - and this time there is no carving on the banks!
In this video you will find step by step instructions with which you can easily and quickly make a yo-yo from corks with your own hands. As you can see, the process of assembling the toy in this case is simple and safe, so even school-age children can entrust it.
Choose any of the proposed options and make yo-yo to play for fun. By the way, any of these crafts can be painted with acrylic paints in the color that you like. So you get a unique and interesting toy.
An inexpensive set of acrylic paints can be ordered on AliExpress (look at this link). Bright colors, excellent quality, high durability - a versatile option for a variety of crafts.
Finally, we add that the yo-yo is considered an anti-stress toy, so not only children, but also adults like it. Play and relax to your health!
Views: 4 711
So that you have a great mood in any weather, make new things from improvised means. Quick crafts that take less than an hour to make.
The content of the article:
Sometimes you want to pamper your child with a new toy, but there are no financial opportunities and time to make it. Therefore, we decided to pick up for you the fastest simple crafts that you will spend no more than an hour on. The family budget will not suffer, as they are mostly made from waste material and all sorts of leftovers.
How to make a doll from threads and a dandelion with your own hands?

You will create it while relaxing in a comfortable chair. The main thing is to arrange everything you need nearby so that you do not have to get up again. It:
- threads;
- half a sheet of cardboard;
- scissors;
- a strip of flesh-colored fabric;
- markers.
- Wind the threads around the postcard with an impressive layer.
- Tie the finished winding with thread. Decide where the doll's head will be. Designate it by also rewinding the thread.
- Do the same for the right and left hands. To make doll brushes from thread, rewind your hands at wrist level, cut the yarn around the fingers of the toy.
- Also, separate the torso from the legs with threads, and perform them in the same technique as the arms, just make them longer.
- Measure a strip of flesh-colored fabric over the volume of the head, glue its sides.
- Wind the hair threads around your hand, cut the resulting roll on one side. Glue to the head, trim the bangs if desired.
- Use markers of different colors to draw facial features.
- Sew a sweatshirt for the toy or tie it up with a piece of fabric to make an apron. You can tie a handkerchief to become a cloak. Such clothes are made with pleasure by children, who will surely appreciate the new doll made of threads.
If you are making a girl doll, then you do not need to indicate her legs. Let the threads evenly cut at the bottom become a skirt.
Such simple crafts will surely please the kids. You can also create a fluffy dandelion from the leftover threads.

For this charm you will need:
- yellow and green yarn;
- wire;
- PVA glue;
- knitting fork or metal staple;
- scissors;
- gypsy and thin needle.
- Wind yellow yarn around a knitting fork. Thread the gypsy needle with a thread of the same color. Sew it in the middle.
- Lubricate the resulting line well with glue. Remove the created web of yarn from the fork, twist it with a roller.
- A thread is wound in the middle to give the workpiece the shape of a dumbbell. From above, coat the middle of this part with glue, wait until it dries.
- Such simple crafts are interesting for both adults and children. They are made quickly, but part of the time is spent waiting for the glue to dry. Therefore, it is better to make crafts in the evening, and the next day to continue entertaining needlework. What are we going to do now.
- Cut the resulting dumbbell in the middle. On the first and second flowers, you need to cut the loops with scissors, carefully comb them to get fluffy hats of two dandelions.
- The green yarn from which we will make the sepals must be cut into segments 4 cm long. We thread the same thread into the gypsy needle, sew the segments across, but not in the middle, but stepping back from the edge 2/3.
- Trim the top with scissors, trim it, make another line parallel to the first.
- Lubricate the back of the flower with glue, attach the sepals here. Wrap it with the same thread that was stitched. Glue both ends and leave the workpiece to dry.
- In the meantime, you will wind the green thread around the glued wire. Get a stem.
- Insert a thick needle from below into the sepal, twist to make a hole for the stem. Install it there, after lubricating this part with glue.
- The leaves can be crocheted, but since we make simple crafts, cut them out of green paper or cardboard, glue them on the stem.
How to quickly make crafts from animal tissue?
If you want to spend less than 30 minutes making a new toy, then make these funny mice. They don't even need to be sewn. By making cuts in a certain way, you will make these rodents.

See if you have:
- pieces of felt;
- juice straws;
- beads or small buttons.
- For each mouse, you need to cut two pieces from one fabric. The first will become a body, pointed from the muzzle, rounded on the other side. Cut out the ears in the shape of a figure eight.
- From a fabric of a different color, you need to cut a small circle for the nose and two larger ones for the ears, glue them in place.
- Use scissors or a clerical knife to make 4 cuts on the body of the mouse. Two will be vertical, at the back of the head, and the other two you will make in the area of \u200b\u200bthe rump to put the straw here. Position the ears on top of the head by threading them through the incisions.
- It remains to glue beads or buttons instead of eyes and marvel at how quickly crafts are made from simple materials.

If the child is bored, you can make a fabric appliqué with him. Such funny bunnies are also sewn on the worn knees of children's trousers to update this thing.

Transfer the applique to the fabric, cut it out. They decorate the bunny by sewing a bow to its ears, and a carrot on the body. Attach eyes and other facial features. If this is an applique, then you need to glue the hare on cardboard.
And here are some more simple crafts - in the form of birds. You can cut these out of the remnants of felt, glue the nose, eyes, wings and play a home performance.

Crafts from cones with their own hands for children

They are also made simply and quickly.
To make gnomes, take:
- Pine cones;
- light plasticine;
- pieces of felt or fleece;
- glue;
- brush.
- Let the child roll a ball out of plasticine, with the back of the brush make indentations in it for the eyes, mouth, nose. They will be filled with pieces of plasticine of the corresponding color. So, the eyes can be brown or blue, the mouth is red.
- Attach the head to the top of the cone. Cut out a triangle from felt, glue its sides to make a cone. Put this cap on your character's head.
- Cut out mittens from the remnants of the fabric, attach them to the bump with plasticine.

For such crafts from cones, like an owl, we also need:
- 2 caps from acorns;
- yellow paint with a brush;
- plasticine;
- accessories in the form of feathers, ribbons.
- First, the cone and the acorn cap need to be painted, continue subsequent work when they dry.
- Let the child roll small balls from black plasticine, stick them to the inverted acorn caps - these are the pupils.
- Make a nose out of orange plasticine, attach it in its place.
- Such an owl made of cones craft is decorated with feathers or ribbon.
- pine cone;
- pieces of dense fabric;
- two toothpicks;
- cotton wool;
- 2 ice cream sticks;
- white paint.
- Let the child paint the bump, remove it until it dries completely.
- Mom will cut a scarf out of checkered fabric and tie it around the snowman's neck. He will make headphones from felt, glue them to the character's head.
- The child will make the nose and mouth of a snowman out of plasticine, attach it to his face.
- Make hands from wire wrapped with a strip of cloth or tape. The wire needs to be wrapped around the bump.
- Put toothpicks in the hands of the snowman, with pieces of cotton wool glued to the bottom of these sticks.
- Paint the ice cream sticks, when they dry, install the snowman on these skis.
Quickly and simply done and these are the piglets. Glue the scales from the cones in the form of ears to the spruce cones. Attach the patches, which will become acorn caps. You can use not glue for this, but plasticine.

Paint the piglets pink, you can use spray paint for this. When it dries, only after that you attach small black beads that will become eyes.
For this craft, you need an unopened cone. But over time, the scales open up. To avoid this, dip the cones in wood glue diluted with water for half an hour.
Take them out of the solution, shake them off. After 3 days, the bump will dry completely, fixing the scales, which now will not open. After that, you can cover this natural material with paint and make new items.
The next simple craft is a forest corner. For her, take:
- CD disk;
- plasticine;
- spruce and pine cone;
- an acorn cap;
- glue;
- paints;
- eyes for toys
- Paint the disk green, draw flowers on its surface.
- Let the child roll up the hats and legs of the mushrooms, connect them.
- The base for the hedgehog can be molded from plasticine or polymer clay. Then cover it with brown paint.
- When it dries, stick scales from a spruce cone into the back of the hedgehog. Put a hat on his head.
- Glue the eyes, nose, mouth, put a cane stick in your hand. The other will contain a basket with mushrooms, which are molded from plasticine.
- Attach the hedgehog to the stand, after which another wonderful craft is ready.
Tie floristic wire to the cones, put picturesque flowers in a jar, previously wrapped with twine.

From cones for the garden, you can make another craft, such a wonderful decorative basket.

If you need to quickly make a hedgehog to bring to kindergarten, mold his body and head from beige plasticine, and roll up his eyes and nose from black. Stick seeds that will become thorns.

Simple crafts for a great mood
Now the sun peeps rarely, more and more cloudy weather. In order not to succumb to despondency at this time of the year, make mischievous tricks that will certainly improve your mood.

Settle at home in a vase with these cheerful flowers that are made from almost nothing. For them, you just need to take:
- colored paper;
- cardboard from a white box;
- marker;
- stationery knife;
- tape;
- scissors.

Paint the eyes with a black marker, bend the petals forward.

Cut out a stem from cardboard. At the top, on one side, glue the finished part, on the other, a pre-cut flower with petals.

Bend a green sheet of paper in half, draw an oval line on it, cut it out. If available, use zigzag scissors. Make the notches simple.

Tie paper flowers with ribbon, and if there is taffeta, then use this fabric for decoration. You have got a bouquet that will never wither, will amuse you.

You can attach flowers with a toothpick to washed beets or pineapple. You will get a beautiful tortoise shell. You will make her arms, legs and head with a neck from carrots. Attach these parts to the body with toothpicks too.

If you want the New Year to come soon, decorate the white objects in the apartment by turning them into snowmen.

Attach black magnets to the refrigerator, and now the holiday character has settled in your kitchen. If you draw on a white vase or stick round eyes and an orange nose in the form of a carrot, then another snowman will amuse everyone at the table.
See what other quick and easy crafts you can make.
Helpful Hints
It is not necessary to have a special gift to make something beautiful and unusual. If you know some tricks, then it is quite possible to make beautiful decoration for a home or a gift, with a minimum of effort and using very few materials.
On our website you will also find:
Here are just a few of the simple crafts that absolutely anyone can do:
Simple DIY crafts
1. Autumn candles

You will need:
Leaves (real or artificial)
PVA glue (decoupage glue)
Brush or sponge

* Wipe the jar with alcohol to get rid of fats.
* Apply glue to the jar.
* Use straight leaves to decorate the jar.

* You can lubricate the glued leaves with decoupage glue.
* Add a thread and a candle for beauty.

2. Painted cup

You will need:
Oil markers
Scissors

* Cut out a stencil of any pattern or letter from cardboard.
* Attach the stencil to the cup and start dotting around it with markers of different colors.


Just with your own hands
3. Painted jars

You will need:
Alcohol (for cleaning jars)
Acrylic paints
Jewelry (flowers)

* Clean the jar with alcohol.
* Paint the jar in any color and leave to dry.
* You can add a drink with a marker (in this case, a relief is applied on the bank, which is erased).
* Insert flowers into a vase.

4. Colored sneakers

You will need:
Fabric markers
White (light) sneakers
Pencil

* With a pencil, draw the desired pattern on the sneakers.

* Trace the drawing with a marker and start coloring as you like.

The simplest crafts
5. Craft from wine corks

You will need:
Wine corks
Pencil
Super glue
* Draw on paper any simple shape - in this example it is the shape of a heart.

* Start gluing the corks to each other (apply glue only to the sides, do not apply glue to the ends, so as not to stick them to the paper), placing them on the drawing to end up with a heart.

6. An infinity scarf from an old T-shirt


You will need:
Old/unnecessary T-shirt
Scissors
Thread and needle (sewing machine)
* Cut off the left and right edges of the T-shirt (see image). The width of the T-shirt will then become 35 cm.

* Cut off a small part from the bottom and top (where the neck is).

* Sew both halves from the inside, and you get a scarf.

Easy and simple do it yourself
7. Bright vases from glass bottles

You will need:
Watercolor paints
bottles
Bowl and brush (if needed)
Syringe (if needed)
* Pour some paint into a bowl. You can mix several colors to get a different color.

* Pour the paint into the bottle. It is more convenient to do this with a syringe - draw paint into the syringe, and then inject it into the bottle.

* Rotate the bottle so that the paint covers all the glass inside.

* Turn the bottle upside down and leave in this position in the sink - excess paint will flow out.

* When the paint dries, you can add water to the vase and insert flowers into it.


8. Towel dryer
If you have an old ladder, you can clean it, if necessary, sand it and even paint it. After that, it can be placed in the bathroom to hang towels.

Simple paper crafts
9. Garland of paper cups

You will need:
paper cups
ordinary garland
Knife or scissors.

* Make a cross cut in each cup.
* Insert a garland light bulb into each hole.
* Decorate the room with a garland.
10. Golden Canvas
Even if you do not know how to draw at all, you can make a very beautiful project and decorate the interior with it.

You will need:
2 white canvases
Gold, blue and orange acrylic paint
Sponge brush
* Paint each canvas with 2-3 coats of gold paint - let the paint dry after each coat.
* Use the sponge brush to start painting your canvases. One will be blue and the other orange. Make some lines shorter, others longer.
11. Multi-colored keys
If you have multiple identical keys for different locks, use nail polish to color them. Thus, you will know which key is from which lock.

Crafts from simple materials
12. Colored candlesticks

You will need:
Wide glass and narrow glass (or vases of different sizes)
Super glue
Food coloring
* Place the small glass in the large one, and secure both with glue - apply glue to the bottom of the small glass.
* Pour water between glasses and add food coloring.
* Place a candle inside a small glass.
13. Bulb vase

You will need:
Bulb
Pliers
Screwdriver
Wire (if needed)
Cover for the base of the vase (if necessary)
Super glue
Gloves and special goggles (to protect hands and eyes)

* Use pliers to remove the tip of the bulb.
* Use a screwdriver or pliers to remove excess glass from the base. You may need to get rid of several layers of glass - be careful and attentive.
* Glue the light bulb to the base (plastic cover).
* The light bulb can also be hung - use a wire for this.
* You can complicate the task and add an LED light bulb. For this, in addition to the light bulb, you will need small batteries. All instructions can be seen in the video:
Easy crafts for kids
14. Drawing a ghost on a T-shirt

You will need:
Wide adhesive tape
Light T-shirt
Scissors
* From adhesive tape, cut out the details of your ghost (eyes and mouth, for example)

* Glue all the details neatly to the T-shirt.

15. Congratulations from the keyboard
Such a congratulation is very simple to make.

Operating principle
The yo-yo is based on the law of universal gravitation. When “starting”, due to the mass of the discs, the toy flies down, while the rope wound around the axis unwinds and when its supply ends, the structure begins to move up. If you do not give the system additional impulses from the outside, then after a while the movement will stop. However, it is enough to make a light short wave of the hand at the right moment for the toy to spin with new strength and speed. Thus, the fun can continue indefinitely.
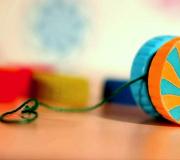
Option number 1 - thread spool
If you think about it, the classic version of the yo-yo looks like a wooden spool for threads of the old Soviet type. Surely, many people remember this wooden cylinder with a hole in the middle and two sides at the ends. Therefore, the easiest way to make a toy is to use this similarity.
The first step is the counterweight device. In order for the yo-yo to spin well, picking up speed along the way, you need to hammer a small nail or metal rod into the hole in the middle of the reel. In this case, it is very important to evenly distribute the load, ensuring that the ends of the counterweight protruding from both sides of the coil have the same length. Otherwise, the toy will constantly shift, “breaking” the flight path, and it will be very difficult to perform even the simplest tricks with it.
Then comes the disks. Their role can be played by circles cut out of tin cans. They bend easily, and after processing, they keep the shape they were given well. Both discs should ideally match in shape and size, so it is better to use pre-prepared templates and patterns for their manufacture. The edges must be bent so that after fastening they look inside the toy. When everything is ready, it remains only to fix the blanks on the ends of the coil with glue.
Ordinary corks from plastic bottles can also be adapted for discs. The advantage of this option is that the lids already have the necessary shape, so you don’t have to suffer with their processing.
Option number 2 - wheels
An excellent material for making yo-yos are wheels from roller skates, skateboards, etc. Their advantage is that such products have exactly the same shape, weight, and are also equipped with bearings, which contributes to improved movement of the toy. In addition, the problem of their connection is successfully solved, since the wheels are already threaded. With the selection of the axis and fixing the rope on it, there should also be no problems. The only drawback is the heavy weight, which makes the toy dangerous, especially for small children and inept players. So, only those who have already mastered the basic basics of handling it can arm themselves with such a yo-yo.
Option number 3 - cans from drinks
First, side parts are prepared from empty cans. To do this, cut off the upper part with a sharp knife or special scissors - you only need the bottom and a strip of tin over it about 1 cm wide. The edges are very sharp, so if you do not take action, then with careless movement, the player can cut himself. Therefore, it is necessary to further process the cut by walking along it with a file, and then slightly bend the edge inward.
To make the axis, you need an ordinary stationery pencil, but not ribbed, but round. From it you need to cut off a fragment about 3 cm long, and try to make the edge as smooth as possible. Further, having found the center of the bottom of the can, you should make a hole in it, the diameter of which is slightly less than the thickness of the pencil. The same must be done with the second circle, and then put both blanks on the pencil with the sides out. Liquid nails are used to secure the disks. At the same time, the problem of making the product heavier is being solved, for which metal shavings are added to the glue.
Rope fastening
This is a very important stage of work. Several points must be taken into account.
Firstly, the length - it must correspond to growth.
Secondly, the fortress, since the twine gets a serious load.
Thirdly, fastening. You can, of course, just tie the rope to the axis, but such a move will significantly limit the stunt potential. The only thing that will be possible in this case is the mechanical movement of the structure up and down. Therefore, you need to make a loop at the end of the thread, the size of which allows you to freely put it on the axis. In this case, having reached the bottom of its trajectory, the yo-yo will not rush upwards, but will rotate on the end of the rope until the player supports it.
The opposite end of the rope should be attached to an object that will be comfortable to hold in your hands. It can be an ordinary door handle, consisting of two identical parts connected on an axis. You can also tie a yo-yo leash to it.
Peter, www.site
Someone will certainly take a look at this collection of ideas and say that it is easier to buy new furniture or decor. But this article is not for them, but only for true connoisseurs of the unique style and handicrafts. Here you will find the 10 most beautiful interior items that you can do for your home without spending extra money.
The best crafts for the home with your own hands from improvised materials for 2018!
1. Decoupage and other do-it-yourself furniture repair ideas
Restoration of old chests of drawers and sideboards is perhaps one of the main trends of our time. Many pieces of furniture fail over time: tables and chairs loosen their bodies, upholstered furniture is pressed through and requires a new “stuffing”. But chests of drawers and sideboards can stand for themselves for many years and annoy you with their outdated appearance.
Home needleworkers and decoupage masters have not only found a way to update the design of old furniture, but have also created a fashion for the use of vintage “grandmother's” chests of drawers in the interior. You will find detailed instructions for painting and decoupage in our article. .
Below are some photos of amazing home projects to inspire you.

Restoration of an old chest of drawers with replacement handles and hand painting: 
 Painting and finishing an old cabinet with metal buttons:
  As a result, the furniture acquired an original Moroccan-style decor effect. Simple, like all ingenious:
By the way, in this way you can create more sophisticated things for the home:

Decoupage and painting amazingly transform old furniture facades, but not every person has enough time and patience for this painstaking task. Therefore, the best DIY home ideas also include refurbishing furniture with duct tape in marble, gold, and other unusual finishes. A minimum of effort - and the most ordinary piece of furniture will turn into the main decoration of your interior.


2. Beautiful things for the home with your own hands: carpets
Perhaps the most pleasant thing about creating things for the home with your own hands is when one of the guests asks: where did you get such beauty? A stylish rug with a zebra print (or other motif of your choice) will certainly deserve such a compliment. And not once.

The fabric can be any. The main thing is that it should not be too demanding in care: it is not afraid of moisture and is easy to clean. In this case, the master chose the vinyl fabric. It is heavy and strong enough to look like a true carpet. What's more, the quality of vinyl these days is very impressive, and it's available in a wide variety of colors and interesting textures.
All necessary materials and tools:
- Thick paper;
- Vinyl upholstery;
- Scissors;
- 2 Krylon pens or regular fabric paint.
Procedure:
- Create a paper stencil. Draw and cut out the outline of the zebra skin, then the drawing itself on it. Do not worry about your artistic talent - the skin of a zebra and should not look uniform or symmetrical. In extreme cases, the pattern can be copied from a picture on the Internet or even printed out to cut out.
- Attach the stencil to the vinyl fabric and outline the stripes with Krylon pens (spray or brush). After that, the stencil can be removed and continue to paint the areas inside the contours.
- Let the paint dry and you're done! To be sure the pattern will hold, you can "seal" the carpet by spraying a clear coat of acrylic spray paint over it.

Krylon handles create a stunning gold leaf effect on the surface of the fabric. In addition, the paint in them dries quickly and is very securely held. If you can’t buy them in your city, then use regular fabric or wall paint. As the next hero of our article.

He took a cheap white rug as a basis and decided to give it an interesting look with his own hands using a chevron pattern. All he needed was thin duct tape, scissors, a thick brush, and two different shades of latex paint.

Finally, another inspiring example where a makeshift stamp is used instead of a stencil. The craftsman had a rubber bath mat, leftover wall paint (thinned a bit with water for a vintage effect), a roller, and an old IKEA wool rug. We look at the photo that he managed to cook from these ingredients.


3. Unusual "marble" DIY crafts (photo)

7. Turn photos into wall decor
This is much cooler than just hanging photos in frames! Your personal photos or any images you like from the internet can turn into beautiful wall art for any room. To make such a decor with your own hands, you can use any of the following methods.
- Find or buy a substrate. A thick sheet of polystyrene foam or polystyrene foam (as in this case), a board and other improvised materials can act as it.
- Print the photo, having previously edited its dimensions so that they are about 5 cm larger than the substrate. These "extra" centimeters will go to the folds.
- Cut the photo and backing into pieces if you want a modular set rather than the whole picture. Otherwise, skip this item.
- Overlay the photo on the substrate and wrap the ends. The author of this product used double-sided adhesive tape to secure the photos. You can mount with ordinary glue or other available means. The very surface of the photographs can also be treated with glue or gloss paste.

- Print the image and prepare the canvas to which it will be transferred.
- Pull the canvas over the frame and apply a thick layer of medium gel on it. These gels are widely used and today they can be bought in any store of finishing materials.
- Place the photo on the oiled canvas and press down. Leave it like this for several hours, but periodically sprinkle with water from a spray bottle.
- Carefully, use your fingertips to start erasing the back of the image from the canvas. Remove all paper in this way.

As a result, you will get a beautiful one with scuffs that will only give it a touch of vintage style. It remains only to apply the last layer of medium gel on it as a protective coating.

For inspiration, here are a couple more ways to decorate your interior with a photo.
 We use an old window frame as a photo frame. How do you like the idea?
8. Creative homemade lampshades for lamps
Homemade lampshades made of fabric, paper, thread and other improvised means will not only decorate your home, but also bring an unusual atmosphere into it every dark time of the day.

Look for the best ideas for your taste in our article . The next photo shows a popular creative thread lampshade.

9. Succulents - do-it-yourself living home decor
A succulent living wall is perhaps the most amazing DIY craft you can make for your home. Agree: if you saw it in someone's design of a living room or another room, you would not be able to remain indifferent!

Dekorin will tell you how to get such an impressive and sustainable decor:
- You will need a shallow wooden container for planting and a metal mesh.
- To fix the mesh on the container, use an impromptu wooden frame, which can be made from small boards or chips. Attach to staples or nails.
- Prepare any for composition. They easily take root in the most difficult conditions and look best when you combine different shades and shapes of leaves. Common examples of succulents: aloe, various cacti, young or stone rose (Sempervivum), stonecrop (Sedum), mountain grate (Orostachys), etc.
- Fill the container with soil and plant your chosen plants in it. Use any cactus mix for drainage.

Here are examples of crafts for the home that you can do with your own hands using the above method.


10. Crafts for the house with your own hands from glass containers
Glass bottles and jars often accumulate on balconies and in pantries. What they just don’t turn into today: lamps, candlesticks, vases, table decor ... It’s amazing how easily they become part of a stylish interior, you just need to use a little ingenuity, as well as paints, fabrics, threads, paper and other improvised means. Last batch of photos for today. Also read:
10 best DIY ideas for your home updated: March 21, 2018 by: Margarita Glushko