Sew a yellow dress with your own hands. Three ways to sew a summer dress without a pattern
Everyone knows that a woman's wardrobe is never full. You always want something new, and especially often this applies to dresses. To replenish the closet, it is advisable to learn how to sew on your own. Taking into account the eternal lack of time, it’s hard not to think - is it possible to somehow simplify the task? For example, try to sew a dress without a pattern.
It is possible to work without schemes and complex constructions prepared in advance by someone, which scare most beginner craftswomen, but such work still has a number of limitations. Not every thing can be created in a matter of minutes and without painstaking work.
- It is impossible to create a fitted sheath dress without relying on a pattern. Of course, you can throw 2 pieces of fabric on yourself, fasten them with needles along the silhouette, sweep the side seams, and visually the product will fit the figure, but it’s far from being as perfect as the right case should do: unnecessary and spoiling the whole look of the folds will appear, discomfort while moving. After all, a pattern is not only a silhouette, but also an account of all the necessary darts and undercuts, calculated from the measurements obtained.
Thus, a dress sewn in 5 minutes with your own hands can only have a free silhouette. If you want to get a more fitted, tight-fitting product, use the trick of experts: find the same dress in your wardrobe, attach it to the new material, circle it in shape and, keeping the seam allowances, cut out the details, then sew them together. However, here you still have to translate the darts of the old dress.

- Regardless of whether you intend to build a pattern or not, you still have to take some measurements: otherwise, instead of an elegant thing, you will have a dimensionless hoodie. This is the girth of 3 main points (hips, waist, chest), as well as the height of the back to the waist (from the 7th vertebra) and the length of the product. If it is planned to sew a dress to the floor, it is recommended to make auxiliary points for yourself: the distance from the waist to the knee and from the waist to the hip.
Initially, you need to decide what style the new wardrobe element will have: without accurate patterns, trapeze dresses are usually sewn, as well as sun and semi-sun, straight fitted silhouettes with drapery. The fabric on them is recommended to choose not too dense: ideally soft, non-wrinkling options: chiffon, silk, satin, crepe satin, you can use cotton with the addition of elastane or viscose when it comes to summer outfits. If you are not afraid of synthetics, you can turn to thin smooth knitwear.
The fastest in execution are models of the Greek silhouette. For their implementation, only a very light fabric is required, the width of which should be 1.3-1.5 m, and the length - 2 lengths of the product.

- To decide how the dress should look on you, where the drapery is needed and how to direct it, throw 1 part (1 length of the product) on yourself in front of the mirror and manually form the neck of the bodice. It doesn't always fit - you might want to make it asymmetric with the 1st wide strap, or drop both over your shoulders, allowing the material to gather loosely on your chest.
- When you are sure that you like the silhouette, pin the main points with pins: this is the width of the waist, the place of the armhole, and also part of the folds of the bodice. It is recommended to immediately pass its facing from above with basting stitches. You can do the same at the back.
- If it is difficult to constantly adjust the model on yourself, but there is no mannequin, sew 2 rectangles along the side seams so that the width of the resulting “pipe” is OB * 1.3 cm. In this case, the seam should stop exactly at the beginning of the armhole.
- After that, start collecting the folds on the bodice according to the same principle, grabbing them with a thread from the inside, process the top edge and cut off the excess. Lastly, add a ribbon as a belt to accentuate the waist and create natural pleats in the skirt.
Interesting ideas can be peeped in the training videos with Olga Nikishicheva: how to sew a dress with your own hands quickly and without a pattern, so that it looks like from the red carpet, how to choose the material and how to cope with the task in half an hour - all this is simply and clearly explained by the famous fashion designer . In particular, a flowing floor-length silk dress looks attractive, due to the simplicity and streamlined silhouette, it is suitable for any woman.
- The shape of the main details is 1/4 of the sun, the radius of which is the height from the 7th vertebra to the floor. Then make a small 1/4 circle in it, from the same point (from the corner), with a radius of 15 cm. This will be the neck, which should then be gathered. Such details must be drawn and cut out 2 pieces.
- After that, make side seams, connecting the parts from the bottom up. However, you need to stop before reaching the neckline 20-25 cm. This figure depends on the depth of the armhole that you want to have.
- For turning the neck, it is recommended to use the same fabric: you need to attach the finished top of the dress to it and repeat the circular bend. The facing width is 5-7 cm. Inside it will be hollow in order to pass a ribbon through it, which will hold the dress on the shoulders. If there is no tape, you can use the same material from which a strip 75-80 cm long and 3-4 cm wide is cut.
Be sure to finish all edges of the inside seams, especially if the fabric is prone to fraying. For greater attractiveness, the neck can be decorated with small decorative elements, tightly seated with each other. And if the silhouette is too loose for you, you should add a belt at the waist. Using the same algorithm, you can make a shorter dress.
Is it difficult to sew a dress for a holiday?
The closer the celebration creeps up, the more often a woman thinks that she has nothing to wear, and sometimes even wonders how to sew a dress with her own hands quickly and without a pattern for the New Year or Birthday. Moreover, these thoughts often appear exactly a day before the event itself, which greatly complicates the task. The solution can be found. Of course, this will require not 5 or 10 minutes of free time, but you certainly won’t have to spend the whole week at the sewing machine.
- If you have decided on the silhouette - half the job is done. Be sure to draw a sketch, decide whether the finished dress will be decorated, which will become its “highlight”, the main focus. If you do not want (or do not have the opportunity) to invent decorative elements for him, find an interesting fabric that is self-sufficient in pattern or color. Most often, such materials can be found in European manufacturers, leading fashion houses: in particular, a large number of stunning options from Roberto Cavalli and Dolce & Gabbana. However, such a fabric, of course, will be an order of magnitude more expensive than the “nameless” one.
After it became clear how your dress should look, mentally remove all the draperies and imagine what form it originally came from. The most popular among evening dresses is the empire silhouette, gathered under the bust; when laid out on fabric, it is a rectangle from the hip and narrowing to a point under the chest, as well as an almost complete fit along it. There are 2 options for tailoring, and the choice is yours.
- According to professionals, it is most reasonable to make a cut-off dress under the bust. To do this, you need to cut a rectangle, the width of which is 10-12 cm more than the volume of your hips. In this case, the lower short side remains equal to this value (OB + 12), and the upper one - OB-3. Thus, an elongated trapezoid will be obtained, cut out by the 1st part in order to have a seam only at the back.
- For the bodice, a rectangle is drawn, the height of which is equal to the distance from the junction of the bodice and the skirt to the estimated upper edge with an increase of 10 cm. The width is calculated using the formula OG * 1.5, since it is supposed to create folds, which will allow you to do without tucks.
- First, you need to process the edges of each of the 2 parts, for which it is recommended to use an overlock: remember that in this case the seam allowance should be at least 5 cm, because. overlock cuts off part of the fabric. In the absence of such a technique, you can simply perform a zigzag seam on a conventional machine. Bend the long side of the rectangle for the bodice 2 times (by the same 10 cm), hem it: this will be its upper edge.
- Then connect the bodice and skirt at the place of their intended meeting, sweep, creating a uniform drapery: the depth of the folds will be different at the top and bottom. After that, pull a long thread through the resulting seam and pull it so that its length is equal to the width of the girth under the chest with the addition of 2-3 cm (then the high waist, which is this seam, will not interfere with your free breathing).
- Insert the zipper into the back seam from the top of the bodice, add thin straps if necessary. The best decoration for this type of dress is a belt at the high waist. If the fabric is plain, it can be wide enough, rich in decor. If the material is chosen with a pattern, it is better to take a thin, discreet belt. It is better not to make slots for it: it should fit snugly against the body on its own.
An alternative sewing option is to work with 2 identical wedges, identical to the trapezoid, which was drawn for the skirt part. The upper (short) edge should be equal to the girth of the chest with an increase of 3-4 cm. In this case, there will be side seams along which they are connected, forming a rough silhouette. After that, the upper edge of the bodice is processed, the waist is pulled together with an internal thread, a belt is added to cover the assembly line. The zipper is inserted into any of the side seams.
A dress of this style is recommended to be sewn from thick chiffon or stretch satin, or even made from 2 layers so that the upper thin one does not shine through. It is perfect for owners of rectangle and pear figures, as it hides the absence of a waist line and excessive hips, and also stretches the figure, which visually makes a woman taller.


Trips to the sea, family holidays in the country, evening walks in the park and cocktail parties require new clothes in the summer wardrobe. But if your budget does not include expenses for a cardinal wardrobe change or expensive outfits, we suggest sewing simple but beautiful summer models for different occasions.


Plain knitted
If you have not yet acquired a summer dress for every day, then it's time to sew such a simple model with an original print that does not require an intricate pattern or even darts.
Choose a knitted fabric that is thin and elastic, with a high content of cotton. Thus, the dress will pass air well, and thanks to the addition of artificial threads, it will stretch, but do not wrinkle. This model is also suitable for cool weather, just choose a dense fabric.

Before cutting, iron the cut with a hot iron. Instead of a pattern, take a t-shirt with sleeves that fits well on you.
- Fold the jersey in half along the shared thread, attach a T-shirt and circle it with soap or chalk.
- Lengthen the skirt of the dress to the desired height. Adjust your hips. If they are lush, then make the necessary increase.
- Cut out the front and back, not forgetting the seam allowances, about 1-1.5 cm.
- You can make the front neckline deeper or smaller and the desired shape.
- When attaching a T-shirt, cut out the sleeves.
- Then cut and stitch the neckline. To do this, attach the front and back bodice, and circle the neck. Make the width 5 cm.
- Sew the shoulder seams with a zigzag stitch. So you immediately process the slices.
- Sew in the sleeves, matching the cut of the shoulder and the middle of the sleeve, and then securing with pins.
- Stitch the side seams to line up with the seams on the sleeve.
- Make a hem at the bottom of the dress.


Light shirt dress
A straight shirt dress will look good on any figure. Side slits add piquancy, a belt accentuates the waist, and a pleat at the back adds comfort when moving.

cutting
This pattern can be used as both a blouse and a tunic. It all depends on the length you choose. Therefore, below are 2 options for the layout of parts on the fabric.

From viscose, cut out 2 shelves, a back and a yoke, consisting of two parts. Also open the sleeves and 2 cuffs 7 cm wide and 30-32 cm long, depending on your size.
For fastening, you will need a strap for loops 9 cm wide and the desired length, as well as 2 parts for a belt 93-100 cm long and 10 cm wide.

Sewing
- Make a hem at the bottom of the front and back, tucking the edge 3 cm and stitching.
- Unscrew one-piece pickups along the fold lines and iron. Sew off the left edge.
- Fold the buttonhole bar in half lengthwise with the right side inward and sew the bottom cut. Turn it inside out and mark 8 loops in the middle. The first should be at a distance of 1.5 cm from the top cut, and the bottom at a distance of 30 cm from the end of the plank. Mark the rest at the same distance. Overcast the loops and sew the bar.
Stitching the collar and cuffs
- Lay a bow fold on the back.
- Stitch the elements of the coquette together, and then sew the part to the back. In this case, the allowance for the cut of the neck should protrude beyond the edges of the necks of the shelves.
- Stitch the outer sections of the collar elements along the wrong side. Turn the collar inside out and stitch with the stand, right sides together. Unscrew the stand and sew into the neck.
- Fold the sleeves into folds and sew into the armholes.
- Stitch the side seams on the bodice and the seams on the sleeves with a single stitch.
- Sew short sections at the cuffs. And stitch them to the sleeves.
- Sew a belt.


Evening without a pattern
Many followed the fate of the heroines from the Sex and the City series, empathized with them and admired their bright outfits. One of these dresses can be sewn without using a pattern in one evening.
Evening long dress in the Greek style captivates with a simple and spicy slit on the back. For its tailoring, you will need viscose and several measurements.

- Fold 1.5 meters of viscose 1.5 meters wide in half so that the shared thread is vertical.
- Define your waistline.
- Sew the bottom side seam up to the waist.
- Draw an oblique line on the bodice, having previously taken measurements of the armholes. If you have a small bust or want a more romantic dress, fold the fabric over the bodice into a ruffle.
- Lay the top line, making a drawstring for the cord.
- Fold in the ruffle and hem, and then pull the cord through with a pin.
- Sew the ruffle at the back to the side part from the inside. So that it does not bulge in the front, hem the edges and sew.
- The edges of the fabric can be processed with an overlock or a zigzag stitch.
- Pick up a belt to the dress or sew it from a contrasting material.


Front and back view of the finished evening dress.


Cocktail with asymmetrical bodice
Short summer dress in draped crepe satin with asymmetric shoulder straps that perfectly follows the curves of the body, creating a seductive silhouette.

cutting
You can make the skirt on the dress very short or long, so there are 2 options on the layout plan.
Reshoot the details of the pattern on paper, increasing to the desired size and setting the desired length. Then cut out the crepe-satin pieces, stretching in the transverse direction, not forgetting the seam allowances.

Sewing
- On the front bodice (det. 1) from the wrong side, stitch the folds to the arrow marks, iron and sweep along the cuts.
- On the left shoulder strap (det. 3), with running stitches, transfer the lines of the folds to the front side. Lay the folds and iron, then sweep along the cuts. Unscrew the one-piece facing along the fold line onto the shoulder strap with folds face to face, grind the longitudinal sections. Turn the strap inside out and iron. Sweep the top and bottom edges. Fix the folds of the folds with stitches on the facing.
- Baste the left shoulder strap, and then sew it to the front bodice.
- Stitch the facing (det. 4) to the front of the bodice, starting from the right armhole, then along the shoulder cut.
- Baste the back end of the left shoulder strap to the shoulder section on the back.
- Stitch the back facing to the back bodice, securing the left shoulder strap.
- Stitch the bodice along the right side cut, and then short cuts of the facing.
- On the details of the skirt, stitch the pleats and stitch the darts, then sew the seam on the right side.
- Gather the bottom cut of the top of the dress and stitch the skirt.
- Sew the zipper into the left side seam and hem the hem.


For full
A summer dress with a flying skirt, a deep and at the same time modest teardrop neckline and numerous gathers on the bodice can be worn both for work and for a party.
The top is reminiscent of a traditional Bavarian blouse, so if you shorten the skirt to the hips you get a trendy tunic.

cutting
Cut the details of the pattern and enlarge to the desired size.

Separately cut out 2 rectangles for a skirt 80-89 cm wide depending on the waist and 75 cm long, including allowances. Also cut out 2 strips for folds on the bodice 21 cm wide and equal to the length of the bodice. The set-in belts in front and back consist of three parts.
For the belt, cut out 2 pieces 2 m long and 17 cm wide, including allowances.

Sewing
- On the stripes for pleats in the longitudinal direction, mark the lines of the middle of the front at a distance of 1.5 cm from the cut and 5 lines for pleats. Mark the first fold line of the fold at a distance of 2.5 cm from the mid-front line, mark the next fold lines at 3.5 cm intervals.
- Press the folds inside out and stitch. Bend the last fold. Make the second strip with folds symmetrically to the first.
- Stitch the details to the corresponding front shelves.
- Stitch grooves on the details of the bodice.
- Gather the upper sections of the bodice by laying large stitches and pulling them together.
- Sew the shoulder seams.
- Stitch the details of the collar along the short cuts and the top, folding them facing each other. Turn the collar inside out and sew into the neckline. Make a loop and sew on a button.
- On the front bodice, sew the right side seam.
- Sew the three parts of the set-in front belt together. Do the same with the details of the back belt. Stitch both belts along the right side cut.
- On the skirt, sew the right side seam. Gather it to the length of the lower cut of the set-in belt. Attach the belt to the bodice and to the skirt.
- Sew the zipper into the left side seam.
- Sew sleeves and stitch.
- It remains to hem the bottom of the dress and sew the belt.

Video. Long sundress
After spending a little time, you can sew an elegant sundress.
With the onset of summer, you want to add colorful summer dresses to your wardrobe. But there is not always time and opportunity to buy a few new products. Therefore, we suggest you sew them with your own hands! Your product will be exclusive and exactly the way you want!
This season, white simple dresses and sundresses made of light fabric are very popular. They can be both classic and with embroideries or other accessories. Such models are suitable for girls with any type of figure and height.
How to sew a simple summer dress with your own hands - tips for beginners
It is quite easy to sew such a model, because it has a simple cut. The most important thing is to decide which material sew it. Any lightweight material will do: cotton, linen, chintz. But, in addition to choosing the material, you need to take measurements yourself so that the pattern is correct.
When building it, you will need the following measurements:
1. Bust and overbust
2. Neck girth
3. Shoulder length, from back to waist and future product
4. Shoulder length
Popular articles:

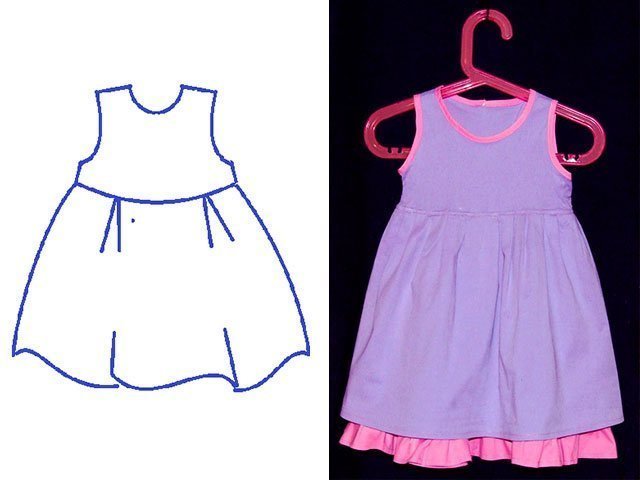
Summer dress for girls
It is very difficult for mothers with children to find a lot of time for complex and large patterns. Therefore, we will provide you with several simple tips, like at home sew a summer dress with your own hands. To do this, we need a T-shirt or T-shirt, on the basis of which we will make a pattern.
1.The very first thing is to find a T-shirt that fits well on your child, and place it on a large sheet of paper, drawing paper or graph paper.
2.Position and align the product on paper and trace around with a pencil. Following the photo - instructions below, lengthen the side lines.

DIY ball gown for a girl
This style is already more difficult to sew than the previous ones. For this, you are provided video for a detailed description of the sewing process.
Long and straight dress (video)
It is suitable for romantic dates - you can create a beautiful summer evening look.
https://youtu.be/Rr0vORgcH9w
Off shoulder dress
This model is very relevant this summer. It is very comfortable, practical, and most importantly - beautiful. For more information on how to sew a model on the shoulders with open shoulders without sleeves, our video will tell you:
Do-it-yourself summer dress quickly and without a pattern - models from different fabrics
Summer dress without a pattern very easy to sew. The length of the product can be chosen according to your taste. You will learn more about how to sew it with your own hands, without using the scheme, from the video:
Knitwear style
Take a piece of knitted fabric with viscose content- a square with a side of 150 centimeters. Next, you need to fold it in half and take off hip measurements and chest. At the bottom of the material, measure the half-girth of the larger measurement. After which you need draw a line up, but do not reach the edge of 25 centimeters.
Now the product can be stitched, extending the line by 1 cm, as shown in the photo.
In the formed backstage stretch the tape. Shoulder cuts can be stitched, or pinned with a brooch.
Cotton and linen beachwear
This dress is very suitable for a beach look. And most importantly, his very easy to sew by hand. Perfect for him cotton or linen. We cut out identical back and front parts from the selected fabric. We fold them and sew the side seams. It should be noted places for sewing in rubber bands into the product. To do this, just attach the dress to you. Rubber bands are cut to the same size: Wrap yourself with an elastic band so that you are comfortable. We sew the elastic bands and evenly placing them on the product, sew them on. You can also make a frill, if necessary.
From chiffon and chintz: photo
Trace a T-shirt with seam allowances on the selected fabric. Immediately simulate cutout.
Make a trapezoidal flare from the armhole line on the back of the dress, making a cutout for the skirt. Mark the length of the skirt in the middle of the back, for example, 115 centimeters, and round the hem to the side seams.
Summer dress from old things: master class
Take old t-shirt and skirt, or a piece fabric lying around at home. They must approach each other. The top is better knitted and the skirt should be lighter. You will make such a model in less than an hour.
1. Cut the shirt in the middle or slightly lower, depending on the volume of the chest.
2.Material for the skirt wrap around g waist about two times and trim. Fold the fabric in half and sew up the sides.
4. Connect the top and bottom, as shown in the photo below, and bast the parts together. The top should be without folds, and the bottom should be vice versa. If everything is done correctly, then boldly sew on a machine.
DIY summer dress for pregnant women
Only one measurement should be taken - hips
. If you already have big belly
, so is its volume.
1. Cut out your chosen fabric rectangle - 130 cm by 160 cm and fold it four times.
2. From the fold line you need to measure ¼ waist or hip measurements + five centimeters. From this point, set aside 40 cm up.
3. For sleeves you should set aside 30 centimeters and connect the dots, as shown in the photo.
4. Cut out the part along with the neck. Sew the dress and process its bottom. In the sleeves, you can make a drawstring and stretch an elastic band into it.
Hi all. In the midst of a hot summer, you suddenly realize that there are still a couple of summer dresses missing. Let's try to sew a dress without a pattern quickly.
Exclusive Outfit
If you decide to sew a dress with your own hands, then you can give free rein to your imagination by inventing something that you will not find on any girl.
Let's get down to business!
First, we will sew a straight dress. You will need two lengths of knitted fabric. If the material does not crumble, the sleeves and neck can be left untreated, the bottom can be bent.

The length of this model can be any.

party outfit
You were invited to a party, but there is no new outfit. In 2 hours you will update your wardrobe by sewing a wonderful stretch fabric evening dress without using a pattern.
The most elegant outfit has always been considered a little black dress.
- Take 1 meter of matter, fold in half.
- Put on a T-shirt with wide shoulders.
- Outline the top, then from the waist line, set aside the desired length.
- Then cut out, stitch the side and shoulder seams.
- If the neck is small, increase its size.
- Next we sew the sleeves. We cut out 2 rectangles, making a width that corresponds to the circumference of the arm in the widest place, and the length can be taken as desired - 45-60 cm.
- Attach the rectangles to the shelves and cut along the line of the armhole.
- Now the resulting sleeves need to be sewn on.
Following the description, you will get a great outfit for the evening.
Festive dress in 15 minutes
- Take the stretch material: length - 160 cm, width - 140 cm.
- Fold in 4 layers. Measure around just below the waist. Round off the edges.
- From the middle, measure a quarter of the measurement, draw a line up 60 cm.
- Sew very evenly.
- Cut out the neck, 40 cm long, 4 cm deep. The outfit is ready!
Let's go on vacation!
If you are planning a vacation at sea, then a beach dress is an indispensable attribute of a summer holiday.
Let's try to sew some beach outfits.
Drawstring dress without a pattern
We draw a rectangle, the width and length of which will depend on the desired dimensions. The shelf and back of the product will be the same. The shelf can be decorated with embroidery or beads, so as not to be confused.

With drape

We take a thin flowing matter. It can be satin, silk, muslin, crepe. The product will have only one seam on the back.
- The length of the rectangle is 2-3 meters (it all depends on your size and on the “thickness” of the folds).
- In the center of the rectangle we make an incision to the depth of the neckline: 5-10 cm.
- We make out the upper edge as a drawstring, into which we insert 2 ribbons. At the back, the ends of the ribbons are sewn into the seam on the back, and in front we bring it out of the drawstring into a slit and, when putting on the product, we tie it at the back of the neck.
- Tie a ribbon under the bust.
Light sundress
Take a T-shirt, attach it to the fabric and do everything as shown in the picture.

Dress to the floor
The long one is sewn very quickly, but it looks - charming!
How to sew:
- You will need fabrics: two lengths from the shoulders to the waist with a width of 140 cm, plus 10 cm for the hem. Waist to floor length for petite ladies.
- For the top, take a rectangle, fold in half. You will get a length from shoulders to waist plus 10 cm, cut.
- Set aside from the edge to the width of the sleeve - 25 cm.
- We set aside 45 cm from the bottom up. Between the sleeves we measure the width of the hips plus 10-12 cm for freedom of movement.
- You cut. You will immediately get sleeves and a shelf.
- We sew the side seams and where the cut for the sleeves was made.
- We tuck the top by 10 cm. We sew it for an elastic band, leaving a small frill. Insert rubber band.
- We also turn the sleeves up by 10 cm. We sew for an elastic band. Insert rubber band.
- We sew a rectangle for a skirt, we make folds or gathers at the belt.
- Sew on top and skirt.
- We decorate the waist with a wide belt.


This pattern will make a great summer blouse.
How to quickly sew a homemade dress without a pattern
Home dress should be comfortable and beautiful.
- Fold the fabric in half, attach the shirt.
- Circle the top of the shirt to the waist, then gradually begin to add. Don't forget to leave seam allowances.
- Cut out and sew the shoulder and side seams.
- Bend, turn the neck and sleeves.
- For convenience, pockets can be sewn on.

No one will have such a thing
We will make measurements for sewing a tunic:
- Tunic length.
- Product width (hip circumference + 5-10 cm for freedom).
- Sleeve width (arm circumference + 5-7cm).
Transfer your measurements to the fabric, not forgetting the seam allowances.

Rectangle tunic for large size. Such a product will hide the flaws of the figure.
- Choose a light, flowy fabric.
- Fold 4 times to cut the neckline and wear.
- A ribbon can be sewn to the bottom and tied at the sides.

Another option for a light tunic, which is also suitable for sewing home clothes, if you increase the length. Transfer the dimensions to the material and start sewing!

And a tunic and a dress! Just a few stitches and you have a beautiful piece in your wardrobe. Even a novice dressmaker can sew this pattern.

If you decorate the tunic with beautiful lace, you will get a nice little dress.
Knitwear can make a beautiful peplum outfit.

- We fold the material along, put a T-shirt on it, circle it.
- Cut out 2 pieces. If the peplum is to be sewn in, then the waist line should be cut.
- A rectangle is cut out of knitwear, the length of which is equal to the volume of the waist and increased by 2 times.
- The length of the peplum is from 10 to 20 cm. Slightly trim on a typewriter with a low thread tension.
- We fold the upper and lower parts, insert a peplum between them, grind.
- We process the neck, sleeves, bend.
Finally, I want to turn to beginner dressmakers: sew an outfit for trial without a pattern from simple material, and then sew more boldly from whatever you want.
Have you decided to sew a dress, but don't know where to start? Let's try to help. We will not argue that this is a very simple matter, but not so difficult! Our tips will definitely help you deal with it. After all, it is not the Gods who burn the pots. So, let's begin. HOW TO SEW A DRESS: WHERE TO START.
Model selection. For the first time, choose a simple dress model. Less connecting and decorative seams, details. Stop your eyes on concise things. Beauty is in simplicity. Do not forget about bright and stylish accessories, they will complement the image.
Choice of fabric. The fabric must match the purpose of the dress and be careful! easy to work. That is, do not cause additional difficulties in the processing of seams, ironing. Textured dressing, pile fabrics, chiffon, natural silk... they are all very beautiful, but they will create a lot of unnecessary problems with the risk of throwing a failed masterpiece into the far corner. Let, for the first time, it will be without a pattern that requires alignment at the seams.
Butt. It refers to all the additional materials that are required to sew your dress. These are adhesive (non-woven fabric, dublerin), edge, zippers (for the first time we advise you to choose models, preferably without it, because not every beginner can beautifully and correctly process a zipper, and even more so a secret one. Well , or practice on an unnecessary piece of fabric.), lining, accessories, threads, etc.
Pattern. How to sew a dress without a pattern? For a beginner, the task is difficult. Even if the dress consists of a rectangle, it is not some kind of abstract rectangle. It is tied to a specific figure with the help of measurements, and to the dress model - by proportions and details. Therefore, a pattern is still needed!
Simple dress patterns:

For these simple dresses, the pattern is based on a rectangle, and is based on measurements taken from the figure. The dress is quite voluminous, oversize, the sizes shown in the picture correspond to 42-50 rubles.

Look what an original dress! Here, the fabric print comes to the fore. The dress pattern is extremely simple. There is a rule of good taste - the brighter, more decorative the material, the simpler the style should be.

For lovers of a non-trivial approach to creating clothes, this solution will be interesting. The dress is a tunic made of rectangles sewn together. This simple dress looks very stylish if it is made of thin suede, or suede-like material.

READY PATTERNS OF DRESSES.
If you have a ready-made dress pattern, then consider that you have already done half the battle. A good pattern increases your chances of getting a new thing at times! On our site we have understandable patterns of dress models that are easy to sew for beginners and for those who have experience in tailoring.
Pay attention not only to the photo of the dress, but also to the technical drawing. It will help you more clearly understand how you can use the finished pattern, adapting it to your image. It's no secret that dresses sewn according to the same pattern, but from different fabrics, look different.
For example, this - absolutely wonderful dress.
In the photo - a model in a dress with bare shoulders from Fendi. Fendi is a world famous Italian brand founded in 1925. It is considered the epitome of taste and style. The brand's clothing is popular on the catwalks, in everyday life and on the set. At different times, the company's designers have designed costumes for such famous films as "La Traviata", "Once Upon a Time in America", "The Godfather" and many others. We offer to sew a similar patier and try on the image from Fendi!

You can buy a ready-made off-the-shoulder dress pattern here. You can print it in full size on a regular printer. Available sizes for patterns - from 40 to 52.
Sewing a dress according to a finished pattern and, moreover, with a detailed description of the technology will not cause much difficulty even for a beginner. Here the main thing is accuracy, accuracy and attentiveness. The result will not disappoint you, because this model is very relevant not only in summer, it can be sewn from elegant fabric, getting a wonderful evening dress.
The level of complexity of this model - can handle even a beginner.
Cut details:
From base material:
1. Before - 1 piece
2. Back - 1 piece
3. Lower back - 1 piece
4. The lower part of the front - 1 piece
5. Sleeve - 2 parts
6. Ruffle the bottom of the sleeve - 2 parts
7. Burlap pocket - 4 parts
8. Neck frill - 1 piece

When cutting to the details, it is necessary to add 1.5 cm allowances for seams.
The average consumption of fabric for such a dress is 2.5 m (with a width of 140 cm).
Recommended Fabrics- easy-to-drape light summer fabrics made of cotton, viscose, silk and their combinations (it is desirable to decatenate natural fabrics before cutting (soak in water), because the dimensions may change).
Layout example:

You will also need about 2.0-2.5 m of elastic band (gum).
Sewing sequence:
1. Fold the details of the back with a shelf with the front sides inward and equalizing the cuts, stitch along the side seams. Overcast the allowances and iron in the direction of the front detail.
2. Also stitch the side sections of the sleeves. Iron the allowances and overcast.
3. Fold the sleeves with the front and back along the armhole lines. Pre-sweep and then grind. Cut allowances to 1 cm and overcast.
4. Stitch the details of the frills of the bottom of the sleeves and the neck into a ring, iron the allowances. Iron the parts in half.
5. “Put” the finished part of the neck frill on the neck of the dress and stitch the cuts together with a 1.5 cm seam (Fig. 1, line 1). Overcast the allowances together and iron on the frill detail. Then stitch the allowance on the frill part, retreating from the seam 1.2 cm (Fig. 1, line 2). Between the line and the seam, you get a drawstring for an elastic band. Do not close the line in the ring, leave a distance of 2.5 - 3 cm long to thread the elastic.
6. Measure the girth of the shoulders (for each individually), subtract 4-5 cm for the stretch of the elastic band. Pass it into the drawstring and close the line into a ring.
7. On the sleeves, sew a frill according to the principle of the neck.

Picture 1
8. On the front side of the front panel and the front side of the part of the back panel, the details of the pocket burlap are placed face down, the cuts are equalized and stitched with a 1 cm wide seam (Fig. 2, lines 1 and 1`) so that the pocket lining overlaps the line limiting the length of the entrance to the pocket, to the width of the seam for sewing the burlap of the pocket. The seams are overcast and ironed onto the pocket burlap.

Figure 2
The lower section of the skirt is treated with a narrow (0.7 - 1.2 cm) folded seam. Iron the seam.
9. Fold the shelf and back details with the front sides inward, equalizing the sections, and connect along the shoulder seams.
10. Stitch the side seams of the skirt with a seam 1.5 cm wide, while sewing the pocket burlap with bartacks at the beginning and end of the pocket (Fig. 2, line 2). Slices are overcast, the pocket is ironed.
11. Stitch the bodice with the skirt (fig. 3, line 1). Cut the allowance to 1 cm, overcast.
12. Cut off the elastic, measuring the circumference of the waist. Sew into the ring with an overlay seam 1.5-2 cm. Sew on the seam margin (figure 3, line 2).

Knitted dress with drapery surprisingly easy to sew, and looks very stylish. Here it is necessary not to miscalculate with the choice of fabric. Let the jersey not be too liquid, but, nevertheless, softly draping and of good quality so that the spools do not form when worn (there should be natural threads in the base).

2 IN 1: PATTERN FOR DRESS AND TOP WITH SWING NECK (SIZE 40-60)
You can buy a ready-made pattern of a dress and a top with a swing neckline here. The pattern will be available in pdf format. You can print it in full size on a regular printer. Available sizes for the pattern are from 40 to 60. Each size is presented in 3 or 4 heights, for a better fit on the figure.


When ordering a pattern, you will receive a pdf-file containing 1 A4 sheet with instructions for printing patterns and symbols, as well as 1 sheet of patterns, which, depending on the size, can be printed on several A4 sheets, after gluing which you will receive one large sheet with pattern outlines:

Dress cut details (A) and top (B):
Shelf - 1 piece
Backrest - 1 piece (with fold)

When cutting, add seam allowances of 0.7 cm, along the neckline and armholes - 1.2 cm, along the bottom line - 2 cm.
The average consumption of fabric is 1.5 m for a dress, 0.85 m for a top (with a width of 140 cm).
Layout example:
An example layout for a dress is shown on the left, for a top - on the right.

Sewing sequence:
1. Lay double lines on the shelf along the side seam between the control signs, A and B, C and D, E and F (for the top - only between the signs E and F) at a distance of 0.5 cm from each other, the first line - along allowances of the side seam, and the second - along the shelf, so that they are located on both sides of the line of the side seam of the product in finished form. Pull these lines with threads to the lengths indicated on the pattern, tie the ends of the threads.
*** If desired, you can arrange small folds instead of assembly along the side seam
2. Lay on the shelf along the shoulder seams double lines from the neckline to the G marks at a distance of 0.5 cm from each other, the first line - along the allowances of the shoulder seam, and the second - along the shelf, so that they are located on both sides of the line of the shoulder finished seam. Pull these lines with threads to a length equal to the length of the shoulder sections of the back between the G marks and the neck, tie the ends of the threads.
*** If desired, you can arrange small folds instead of gathering along the shoulder seam
3. Combine the shelf and back along the shoulder seams, folding them with the right sides. Connect with a stitching-overcasting seam (or simply sew on a machine, and then overcast). Stitching is done from the back. Remove the auxiliary lines that tightened the assembly. Press the seam allowance over the back.
4. Process the armholes of the product. To do this, bend the seam allowances in the armhole area (between the control marks), and then process the seam to the hem with an open or closed cut (in the first case, pre-overcast).
5. Fold the shelf and backrest right sides, matching along the left side seam (without gathers). Sweep, and then connect with a stitching-overcasting seam (or sew on a machine, then overcast). Iron the seam allowance.
6. Fold the shelf and back with the front sides, combining along the right side seam (with gathers), observing the alignment of the control signs on the shelf and back. Sweep, and then connect with a seaming-overcasting seam (or sew on a machine, then overcast). The line is performed from the back. Gathering must be at the bottom, as otherwise the foot may move the fabric during sewing, which may cause the uniformity of the gathering to be disturbed. Auxiliary lines that tightened the assembly, remove. Iron the seam allowance.
7. Bend the cutout of the product and process it with a hem seam with a closed cut.
8. Bend the bottom of the product and process it with a hem seam with an open or closed cut (in the first case, pre-overcast).
HOW TO SEW A DRESS WITHOUT A READY PATTERN.
If you want to go all the way to creating the chosen dress yourself, then this is also possible.
For example, let's take such a dress model as on the inimitable Italian and Street Style legislator Giovanna Battaglia. It is indeed very stylish.

Making a pattern for him is not difficult even for a beginner. Let's take a closer look.
For modeling, you will need a pattern-base of a semi-adjacent silhouette. You can create it by any method of constructing patterns. Of course, this will take you a lot of time, but if you plan to continue sewing for yourself, then you need such a foundation, you simply cannot do without it. By the way, it is also recommended to sew off a base sampler from an unnecessary piece of fabric, after trying it on, take into account all the errors in the construction by correcting the base pattern.

Modeling is shown based on a semi-adjacent silhouette specifically to preserve the chest tuck.
Side seams need to be straightened
We transfer the chest tuck from the shoulder line to the side seam line, under the armhole. To do this, we will cut along the intended line from the side seam to the top of the tuck, not reaching a couple of mm, close the tuck in the shoulder and it will open under the armhole. Read more about transferring tucks here. It is necessary to build up the tuck, not reaching the center of the chest by 2 cm, reducing it to nothing. That is, shorten the length of the tuck by 2 cm.
If the figure allows you to make a dress with a more flattened silhouette, then you can use the base pattern of a straight silhouette, then modeling is not needed at all.
Sewing this dress is not difficult, but finishing will take time and perseverance. Braid a la Chanel, which gives a special chic to the image, can be made with your own hands. Look at the photo. The work is certainly painstaking, but creative. And what is the result!

By the way, having a base pattern, you can also sew a basic dress for yourself, which, as you know, is necessary in the wardrobe of any woman. By slightly changing the neckline or armholes, making the dress cut off at the waist, adding a sleeve, you will get a model to your liking.

Now let's change the pattern a little. For example, we will draw relief lines, deepen and expand the neck, as in the first photo.
1 step. Let's translate the chest and shoulder darts into the armhole. To do this, let's outline the relief lines going from the armhole lines through the waist darts to the bottom of the dress. Cut and open the darts in the armholes of the back and front. Read more about the translation of tucks in this article.
2 step. Let's adjust the relief lines more smoothly. Lengthen and narrow the dress along the side seams. Let's add a slot. Slot width 4 cm.
3 step. It remains to deepen and expand the neck line according to the model.
Modeling a pattern, as you can see, is not at all difficult. You can also make the neck in a boat, as in the second photo, or in a V-shape.
Adjustment of the neckline can be carried out directly during the fitting, without changing the position of the line on the pattern itself. And the details of processing (turning, lining) are cut using the details of the top, i.e. the main details of the dress.

MEMO: HOW TO SEW A DRESS.
To obtain success and quality in the manufacture of the product, always adhere to certain rules of sewing technology.
Before cutting, decant (iron through a damp iron) the fabric, fold in half edge to edge, front part inside. Lay on a flat surface, table, fold away from you.
Lay out the prepared details of the pattern on the fabric, circle the contour with chalk or remnants, add allowances for the seams, which you mark parallel to the cuts of the details. Check if everything is correct. Cut along the seam lines.
Baste darts, shoulder, side seams. Try it on. If there are changes, correct. Proceed directly to tailoring.
The assembly of the product is always carried out after the preliminary preparation of smaller parts. That is, the collar is first prepared, the pockets are turned and ironed, the sleeves are processed with cuffs, stitched to the sleeve, the sleeve head is assembled for assembly, preparing it for tucking into the armhole.
The back is prepared - tucks, coquettes, folds are processed, everything is ironed. A shelf - tucks, assemblies, coquettes, they build pockets ... they iron everything. In general, each seam, after sewing on the machine, must be ironed. This is a very important rule, observing it, you will receive, guaranteed, a better quality item than the one that is only at the end of tailoring. Checked!
And only after that we proceed to the assembly. Stitch shoulder seams, iron.
We grind the side - iron. Don't forget about slicing.
,