Temari is a miracle made of multi-colored threads. Learning to make Japanese temari balls Japanese temari handicrafts
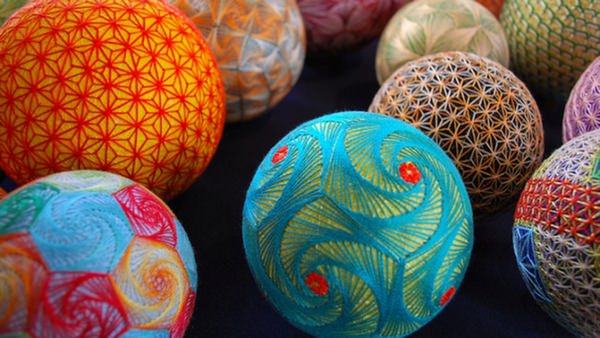
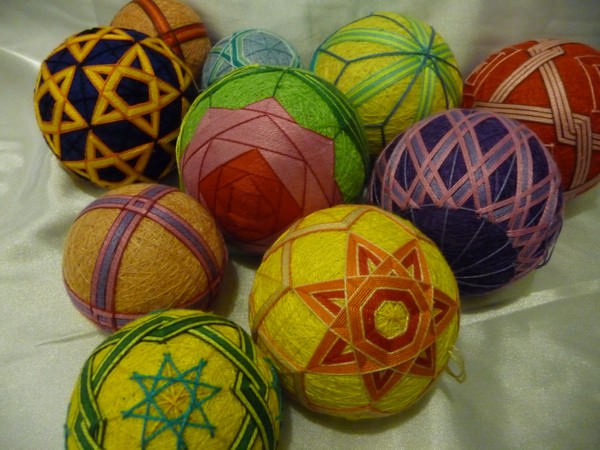
Love for all ages. Including the love of handicrafts. To be convinced of this, just look at the stunningly beautiful collection of temari balls, which was embroidered by a 92-year-old grandmother.
These stunning colorful balloons were sewn by a 92-year-old grandmother from Japan.
The ancient Japanese art is called temari. When it originated, woven multi-colored balls became simply toys for small children. Over time, they changed several uses until they became an element of interior decoration. Today, each region of Japan has its own characteristic colors and patterns.
Mrs. Akua became acquainted with the art of making temari in the early sixties. Since then, she has managed to create about five hundred incredibly beautiful balls with a unique design.
We invite you to evaluate your grandmother’s skill and look at her work over the past two years.


The process of creating temari is very labor-intensive. In order to embroider one ball, talent alone is not enough, you need to have years of preparation and a huge amount of time behind you.


How to make your own temari.
You will need:
Elastic fabric flaps
2 spools of thick cotton thread
Scissors,
Plastic bag.
1. Tightly stuff a thin plastic bag with scraps of elastic fabric (worn tights will do), form into a ball the size of an orange and cut off the excess plastic.

2. Distribute the cut ends of the polyethylene over the surface of the ball without gluing.
3. Wrap the thread around the ball in all directions, securing the polyethylene.

4. Continue winding the thread straight from the spool, making sure to maintain an even tension. If you tighten the thread too much, the shape of the ball may be distorted, and if you wind it loosely, the embroidery will lie unevenly.
5. From time to time, crumple the ball in your hands and roll it on a hard surface so that it is level

6. When changing the direction of winding, hold the thread with your left thumb so that the tension does not weaken.

7. Cover the entire surface of the ball with an even layer of thread so that the polyethylene is not visible anywhere. Please note that during the process the filler will be compacted and the ball will decrease slightly in size.

8. Having finished the rough winding, cut the thread, leaving an end approximately 1 meter long for backstitching. Sew the entire surface of the ball, making 15-20 stitches, insert the needle under the winding and remove it after 3 cm.

When the temari base is formed in the form of a very dense rag ball, the top layer of decorative threads is wound, along which the actual embroidery is carried out. Traditional patterns are usually geometric, sometimes incorporating free-flowing embroidery elements. In any case, work on temari begins with preliminary marking of the ball with special threads.
There are very few types of markings, they have been known for centuries, and all the variety of patterns is based on them. Traditional Temari used only 2 types of stitches for embroidery and several techniques for wrapping the ball, on the basis of which typical design elements were developed, which, by the way, have their own names. The variability of patterns is achieved through various combinations of known elements and their different locations on marking nodes.
One of the simplest markings is marking into four sectors. Using pins with different colored heads, mark the “poles” of the temari (two points located at opposite ends of the ball) and four points on the equator - they should be at equal distances from each other and from the poles. Wrap metallic embroidery thread along all the pins, dividing the ball into equal sections. The winding should start from the top pin and end there; in this place the thread should be secured and the “tail” tucked under the winding. With proper skill, you can divide the ball into an even number of sectors without pins, by eye.
Then you can start decorate temari. Balls of thread can be decorated in different ways, using them in combinations. The most common methods include:
- Winding with decorative threads along the guide lines. To make it hold better, you need to fasten it in some areas with small stitches with the guide thread you used to mark.
- Embroidery different types of stitches.
- Weaving. Usually it is combined with embroidery. By passing one thread under or over another, you can create braided patterns.
Having decorated the ball, you need fasten the thread. You can decorate the finished temari with a decorative thread tassel or a loop for hanging.
Japanese balls made of thread - temari - are a very original type of needlework. With a little practice you can learn create real works of art.


As you probably already guessed, this word is of Japanese origin. Translated, it means “ball of thread” or “ball”. What is temari and why can this thing serve as an original handmade New Year's gift?
The art of temari is quite ancient. It first originated in China, and about 600 years ago these beautiful colored balls were brought to Japan. Initially, they were made by mothers and grandmothers for children and grandchildren to play with. The remnants of old kimonos were used as the “filling” of temari balls - they were wound and stitched to form a ball. Much later, when rubber was invented, the production of such balls became a decorative and applied art, which, by the way, was very popular in the high society of Japan - noble Japanese ladies even competed to see who could invent the most intricate pattern.
Today, Japanese temari balls are highly valued as gifts that symbolize devotion and sincere friendship. According to tradition, mothers make such balls for their daughters for the New Year - they say it brings happiness and good luck. So, if there is a young girl in your family whom you wish happiness, giving such an unusual gift with your own hand is a great idea.
What do we need to create temari?
- The basis. It can be scraps of fabric that need to be rolled into a ball, foam balls, or anything that can easily take the shape of a ball.
- Pins with different colored heads.
- Bobbin threads to wrap around the ball (if a foam ball is used as the base, you may additionally need a soft and thick woolen thread).
- “Iris” threads - we will use them to embroider the pattern.
- A needle with a blunt end, thick enough for the thread to pass through the eye.
- Scissors.
- A strip of paper (about 1x30 cm, maybe a little narrower). It can be cut out, for example, from a magazine.
- A measuring tape (for your first temari you may not need it, but if you want to make balls with more complex markings, you won’t be able to do without it).

We have prepared the materials - let's get to work!
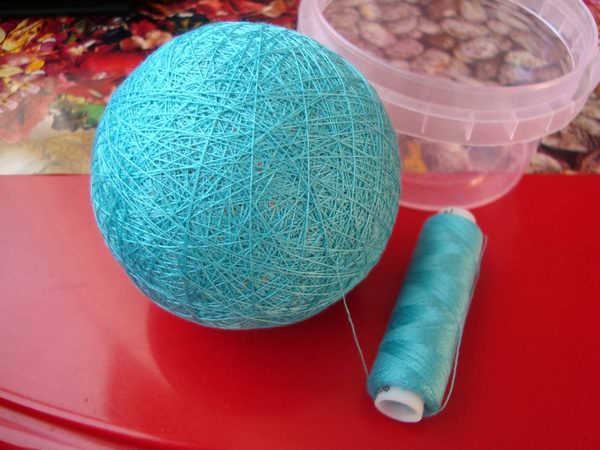
Making the base of the ball
We wind a ball with a diameter of about 5 cm from pieces of fabric (more is possible if desired). Remember that the fabric base is heavier than foam, so if you want to make not a gift, but an original Christmas tree toy, choose foam.
Wrap the finished base with bobbin threads. This needs to be done tightly and evenly, each new turn should lie in a new place - this way you will get the ideal surface of the ball for later creating a pattern on it. It is better to first wrap the foam base with thick wool yarn.
Has the base stopped showing through the winding? Great - now you need to secure the thread. To do this, we thread the end of the thread into a needle with a sharp end and sew the base several times in different directions using a simple “forward needle” stitch.
“Equators” and “poles” - it’s simple!
Cut out a strip of paper (width - 5-7 mm, length - greater than the circumference of the temari). One end of the strip needs to be pinned to the surface of the ball - this is the “north pole”. Now we wrap the strip around the ball and bend it where it meets the pin.
There is a North Pole - we need a South Pole! Bend the strip in half, holding the “north pole” with your finger, and in half again - this will be the “equator”. To avoid mistakes, cut out small triangles at the folds.

You can make markings into 8 or 16 segments - just fold the strip in half one or two more times. If you want to get, for example, 3, 5 or 10 sectors, this is already more difficult - use a measuring tape.
Let's start marking the poles. Wrap the strip around the temari ball and stick a pin where the south pole is. For the accuracy of the pattern, you must check whether the “south” pin is equidistant from the “north” one. To do this, you need to rotate the strip a few degrees - if the cut out triangle coincides with the pin, then everything is fine. Repeat the measurement several times.

Insert pins into the tops of the triangles at the equator, then wrap the strips around the equator and insert two more pins into the remaining triangles. This is where we need pins with colored heads - this will make it easy to distinguish the “poles” of the temari ball from the “equator”.
Return the strip to the north and south poles and check the accuracy of all four pins on the equator. If they are uneven, correct them using a strip.
Marking the pattern with thread
To mark the pattern, take a metallic thread slightly longer than three full circles of the ball. Secure it with a regular knot, thread it through a long thick needle and insert it into the base at a distance of approximately three centimeters from the north pole, and bring it out as close to the pole as possible. The knot should disappear under the winding!
Wrap the yarn over the pins around the ball. At the “north pole”, turn perpendicularly and wrap again, securing at the poles with small stitches.

Imperceptibly, under the base (possibly in several stitches), bring the thread as close as possible to one of the pins on the equator and draw it along the pins, also securing it with a stitch at each meridian. Then secure the thread with 2-3 stitches, insert the needle into the warp next to the fastening point, bring the thread out at a distance of 3 cm and cut. Be careful - it is important not to cut the base here!!!
Half of our New Year's gift - a temari ball - is ready! The hardest part is over, the most beautiful part begins - making the pattern. And we’ll talk about how to properly embroider a beautiful pattern on a Japanese temari ball!
I wanted to learn a new type of needlework, and I chose embroidery on balls, this is a very creative process where you can come up with your own patterns, combine different colors, so that each ball is unique.
What do you think attracts people most about the Temari technique?
In the temari technique, one is primarily attracted to geometric patterns, clear lines, and the unusual nature of this object. Learning how to transfer a flat geometric pattern onto a ball requires skill - it is not as easy as it seems at first glance.
Do you have favorite subjects, patterns, or do you prefer not to repeat them?
My favorite motif is rainbow colors, patterns in the form of intersecting lines, triangles, or spirals. The set of geometric shapes existing in nature is not so extensive, so in order not to repeat myself, I make patterns from different colors. I like to make balloons with different designs; people are always happy to receive an exclusive gift.
Tell us a little about the materials needed to embroider temari balls?
You can use various materials for the base, and then wind the threads on top. You can also take a ready-made foam ball: such a ball will have a perfectly even shape. Next, you can make a base from the bottom layer of thread, and then create markings for the selected pattern. When creating embroidery you can use floss threads, as well as any other threads for sewing or embroidery, now the color range is very wide, you can choose to your taste.
Where do these types of jewelry look best?
Temari balls can decorate any interior; they can also be used as Christmas tree decorations. Such balloons are given for birthdays, weddings, in honor of admission or graduation from school, couples in love or just friends. This original gift will appeal to mothers, grandmothers, and all connoisseurs of handmade creativity. This is a stylish gift for any occasion.
Natalia Golubkova 06/21/2015 2203

The art of creating balls of thread - temari - was born in China, became traditional in Japan and today is of interest everywhere.
It is believed that these bright “balls” bring happiness and prosperity to the house, so it is customary to give them as gifts, decorate the New Year tree and pots with plants with them, and simply use them as interior decor.
Authentic temari (translated from Japanese as “hand ball”) are fabric bags with rice husks, wrapped in strips cut from old clothes, and on top - thick and thin threads. But my mother does it easier.
Step 1
He tightly stuffs scraps of elastic fabric (mostly old nylon tights) about 30-40 long and 1.5-2 cm wide into a plastic bag. He forms a ball the size of an orange from them, cuts off the excess polyethylene, and distributes the ends of the bag over the surface of the ball, without gluing them to the flaps. Secures the polyethylene with thick cotton threads, wrapping them around the ball in all directions.
To keep the ball even, maintain an even tension on the thread and from time to time crumple it in your hands and roll it on the table.
When the polyethylene is closed, cut the thread, leaving an end about 1 m long for performing reverse stitches. Sews the surface of the ball with 15-20 stitches, inserts a darning needle under the winding, brings it out after 3 cm and cuts the thread.
Step 2
The next stage is marking the ball using guide threads, since traditional temari patterns (chrysanthemum, flowers, bamboo, abstraction) are built according to geometric patterns. Cuts a strip of durable but easily wrinkled paper (for example, from the cover of a glossy magazine) the length of the circumference of the ball plus 2-4 cm.
"Stars"
One end of it is pinned with a pin with a colored head (for example, red), establishing the top of the ball, the second - with a pin with a black head on the opposite side, indicating the bottom.
The top and bottom must be exactly opposite each other!
Step 3
Completely bends the strip around the ball, bends it and smoothes the fold - the first fold is obtained. Then he unwinds it, bends it up to a pin with a red head and puts in a second fold - this will be half the length of the ball’s circumference. The center line of the ball is obtained by folding the strip upward again so that the second fold touches the pin. Next, he connects the first fold with a pin and smoothes the fourth fold, the purpose of which is to point to the middle of the arc of the lower part of the ball.
Using scissors, cut small corners at the base of each fold. He wraps a paper strip around the ball, starting with a red pin, and sticks pins with heads of different colors into each corner.
There should be six pins on the ball, and each one should be inserted at the same distance from its neighbors. If the pattern is complex, mark the required number of divisions between the corners on the strip and insert pins into the new cutouts. It is more convenient when there is an even number of them.
Step 4
The marking is made with a lurex thread with a length of six girths of the ball plus 10-15 cm. He ties a knot and makes a stitch in an arbitrary place, after which he sticks the needle exactly in the place from which it came out, and this time brings it out at the bottom of the ball, close to the pin with black head.
"Intertwining Diamonds"
The thread wraps the ball six times from bottom to top, from left to right and crosswise - along all the pins. Secures the thread with several stitches and tucks the tip under the winding.
“You can use winding, weaving and embroidery to decorate temari,” says my mother. – I like the last one. In it, stitches need to be made around guide (cotton or wool) threads. I use silk or floss as decorative threads.”
She creates square and diamond-shaped patterns using method 1.
The needle and thread are brought out at point 1, inserted into the ball at point 2 under the guide thread and brought to the surface at point 3. Next, the needle is inserted into the ball at point 4, brought to the surface at point 5, inserted at point 6, brought out at point 7 and enters again at point 8. One completed stitch in the round comes out. Repeat the same steps at the crosshairs of other guides, starting from point 1 and laying new threads next to the laid ones. So my mother embroidered the “Intertwining Diamonds”, “Stars” and “Summer Mood” balloons.
"Summer mood"
Oval patterns are embroidered using method 2. After completing each stitch, the ball is turned counterclockwise so that the next stitch starts higher.
The needle with decorative thread is brought out at point 1 to the left of the guide thread and inserted into the ball at point 2, also to the left of the guide. Draws the thread under the guide and brings it out at point 3, to the right of the guide. Inserts the needle at point 4, to the right of the guide. One full circle of embroidery is made. Next, the stitches are placed similarly close to each other. The result is a temari like “Pink and Blue Dream”.
"Pink and Blue Dream"
For the herringbone pattern, mom uses method 3, getting a “pigtail” on top and a V-shape on the bottom.
The needle and thread are removed at point 1 and inserted at point 2 under the guide. Brings the needle to the surface at point 3 and then inserts it at point 4, brings it out at point 5 and inserts it at point 6 under the guide, and then brings it to the surface at point 7.
Having covered the entire ball with the pattern, the needle is brought out at point 1. A thread of a different color is laid in the same way parallel to the first. An example is “Pink and Blue Dream”.
"Pink and Blue Dream"
If you are using threads of three or four or more colors, it is better to leave the areas free from embroidery empty so as not to overload the color impression of the temari. At the same time, in this case, and with a more meager palette of colors, you can create a simple pattern of straight stitches with thin lurex thread. This will give the ball an even more elegant, festive look.
Temari are bright balls of happiness, the patterns of which are embroidered using threads of various thicknesses. These balls have long been made for Japanese children to play with. However, this is an adult job that requires a certain taste and skill. In modern times, they have become so popular due to their bright, interesting design. They are usually presented as gifts and used to decorate homes or Christmas trees. In order to learn how to make temari, you need to study a master class on their embroidery.
Looking at the pictures of these bright balls, it seems that making such a Chinese ball is as difficult as building the Great Wall of China, especially if you have never even cross-stitched. However, if you have a great desire to master the technique of embroidery on balls and show a little patience, you can create your first masterpiece step by step according to the instructions. We have selected MK for you - good luck!
Temari - bright balls of happiness, the patterns of which are embroidered using threads of various thicknesses
It is best to start learning the art of Temari with simple geometric patterns.
To embroider such balls you will need:
- 1 Kinder Surprise container;
- 2 beads;
- 1 skein of woolen thread;
- 1 needle with a wide eye;
- 1 set of pins with heads of different colors;
- 1 set of pins without tips;
- a 30-centimeter strip of paper, 0.6 centimeters thick;
- 1 skein of thick cotton thread;
- 1 skein of thin cotton threads;
- 4 colors of satin embroidery threads.
Instructions for beginners:
- Several beads are placed in a Kinder Surprise container. In the future, this element will create a ringing effect when the ball moves.
- The tip of a thick woolen thread is placed inside the container, and then the yarn is wrapped around it. The closed container should be wrapped until it acquires a round shape and a dense structure. The optimal size of the ball diameter is 7-8 centimeters.
- To smooth out any irregularities, the ball is wrapped in thick cotton yarn. It is necessary to ensure that the new threads completely cover the previous layer.
- The third layer is formed by thin cotton threads.
- To secure a thread break, it should be pressed against the plane of the ball and the free tip should be inserted into the eye of the needle. Then 3-4 free stitches are made along the ball surface in different directions.
After the base for the ball is completely ready, you need to make markings.
What can you use as a basis?
The basis for temari embroidery can be made from a variety of materials. Since ancient times, Japanese needlewomen have used leather balls for these purposes, but these days this material is expensive and rare.
Therefore, modern technology makes it possible to use the following materials to create the base:
- tennis ball;
- tights;
- foam ball;
- film;
- socks;
- cotton wool;
- napkins.

You can make a base for temari embroidery from a variety of materials.
Some needlewomen, when making the base, put special aromatic fillers inside it. This technique allows you to get not only a beautiful craft, but also a practical one that can be used as a home air freshener.
Gallery: DIY temari (25 photos)


DIY temari: the art of embroidery for beginners - marking
One of the most important stages in creating a temari ball with your own hands is marking. The simplest marking is considered to be “4”.
It is done according to the following instructions:
- Using a pin with a blue bead, the paper tape is secured in the north pole area.
- The ball is then wrapped in a strip of paper as it passes through the south pole. The strip is bent in the area of contact with the pin, and the excess part is cut off.
- The strip is folded in half and the south pole is marked. In order to mark this area on the paper tape, you need to cut out a triangle.
- Then the strip is folded in half again. This is necessary in order to measure the points of the equator.
- A pin with a red head is stuck into the south pole, and without a tip into the points of the equator.
- Then the strip turns 90 degrees, after which 2 more equator points are marked.
- A piece of thread is cut, 4 times the diameter of the ball.
- A knot is formed at the end of the thread. A needle is inserted 2 centimeters to the right of the north pole. The thread is pulled until the knot made is at the north pole.
- Then 4 meridians are drawn: from the north to the south pole through each point of the equator. A stitch is made in the area of the poles.
- Then the thread section is pulled to any equatorial point, fixed with a stitch and passed through the entire equator.
- The free edge of the thread is hidden in the base of the ball.
- The pins are removed.
One of the most important stages in creating a temari ball with your own hands is marking
It is worth considering that in addition to the “4” markings, there are other schemes with which you can create not only a geometric, but also a floral pattern and abstraction.
Types of temari markings
There are several types of temari markings, which are divided into complex and simple, as well as odd and even.
Even markings allow you to draw the following shapes on the surface of the ball:
- triangles;
- intersecting rhombuses;
- turtle;
- stars.
There are several types of temari markings
Of the even markings, the most often used are “4, 6, 8, 10 and 12”. Floral patterns are most often embroidered using odd markings. The best option for this is considered to be marking “5”.
DIY ball of happiness: diagram
The temari technique should be studied using the simple winding method, supplemented with embroidery elements.
- Along all meridians and the equator, 6 turns of the darkest color are made. To do this, you need to bring the thread near some marking intersection. An indent of 1-2 millimeters is made to the left side, and then the base begins to be wrapped so that the thread is tightly laid parallel to the marking guides. The movement should be to the right. In this way, 6 turns are made.
- Then a gold or silver thread is used to make 1 turn on each side of the formed dark stripe.
- Next, next to the silver or golden thread, a 6-turn strip of medium-saturated color is laid out.
- The resulting strip should be framed with 1 more layer of silver or gold thread.
- Next, a 6-turn strip is made from a light-colored thread, which is framed by a piece of metallic shade.
- To prevent the design from slipping, it should be secured in the corner areas. Fixation is done using pins.
- To prevent the pattern from disintegrating after removing the pins, it should be carefully stitched. The best option would be to embroider square elements at the intersection of patterns.
- In the area where the belts intersect, the warp threads are pulled away from you. The thread is pulled towards itself, the next corner is rushed. The thread should be threaded counterclockwise. Then the warp threads are picked up again with a needle. A square of 4 layers is embroidered in the same way.
The temari technique should be studied using the simple winding method, supplemented with embroidery elements.
If desired, the empty spaces can be filled with additional elements, but such balls with a geometric pattern look elegant and noble.
Basic Rules
In order for mastering the temari technique to be as interesting and effective as possible, during work you must follow a few simple rules:
- when creating the base, the winding should be done tightly, directing the yarn in different directions;
- during marking, pins of different colors should be used: at the initial stage, the designation of each shade should be written on a sheet of paper;
- you should start working on embroidery only from the largest knot, or from one of them;
- each line drawn during embroidery should be secured with a 2-5 mm stitch;
- if the thread runs out, the needle should be pulled out from the opposite side of the ball, and then the free end should be cut off as close to the base as possible.
The main rule of temari: the embroidery thread should in no case be loose, and should not pinch the base too much, as this will deform the final design.
Temari: base for the ball (video)
Temari: embroidering a ball on 8 sectors (video)
The described master class allows you to master the art of embroidering temari balls based on a simple technique of this technique. If you want to complicate the work, you can mark not by “4”, but by a larger number of meridians, and also combine different directions of embroidery threads to form completely new, interesting patterns. As a result of such fantasy work, an innumerable number of variations of ornaments for embroidering Japanese balls of happiness can be obtained.
(13 ratings, average: 4,00 out of 5)